Drum Authoring
From RBN/C3 Documentation
Contents
General Tips
- Note: when "Right Hand/Left Hand" language is used, assume that we are authoring for a right-handed drummer.
Solo and listen to each stream: When first starting a drum authoring session, listen to each stream soloed and learn the sonic qualities of each. What does the kick drum sound like as heard in the cymbal stream? What does the floor tom sound like as opposed to the kick drum? A good place to listen for these qualities is during drum fills. Getting familiar with all these things beforehand will help the transcription process.
Colors and sound: It can be satisfying to author an expert drum level where each drum and cymbal matches perfectly to a pad on the Rock Band kit, but forcing this consistency doesn’t always make for a satisfying playable song.
Let’s say there is a series of blue ride cymbal gems, with a fill on the 2nd rack tom. Even though up until then that rack tom was represented by a blue gem, you may want to consider that putting it on yellow emphasizes the fact that the gem is representing a drastically different sound than the blue gems surrounding it. After all, it’s a videogame - not a lesson in drum hardware!
However, things like hihats and ride cymbals have a more distinctive sound as well as a more important role within most beats, so their placement should remain consistent if possible. An exception to this guideline is when a tom fill requires that the author use all three yellow, blue and green gems for the toms. In this case, the last green tom gem will probably be followed immediately by a green crash gem. While an imperfect solution, it does prevent players from having to cross the right hand over the left to hit a cymbal on blue.
Playing with the grid: Some songs (usually the funkier ones) will have a slight swing to the groove. Try using a 50% or 66% 16th note swing to visually encourage the player to mimic the swing. Be aware however, that too much swing may make the gem pattern harder to read.
Pro Drums
Pro Drums are essentially an addition to the expert track that allows the game to distinguish cymbal notes from tom notes, plus the addition of drum roll lanes.
Displaying Tom Gems
In Pro Drums, the yellow, blue, and green notes default to displaying cymbal gems on the drum track. In game, these must be played on the cymbal attachments for the RB3 drum kit. Because of this, we need to add a modifying note to any hit we want to be displayed as a tom gem. The modifying notes are as follows.
| MIDI / Note | Action |
|---|---|
| 112 E7 | Changes green gems to TOM gems for the duration of the note. |
| 111 D#7 | Changes blue gems to TOM gems for the duration of the note. |
| 110 D7 | Changes yellow gems to TOM gems for the duration of the note. |
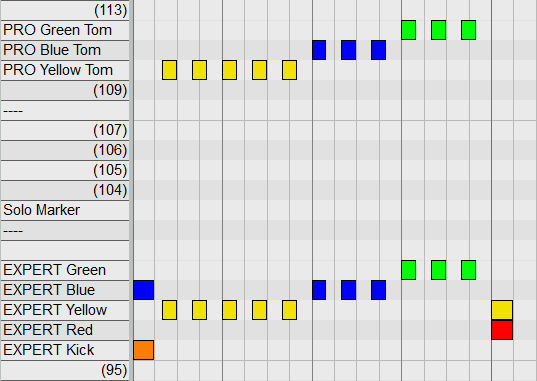
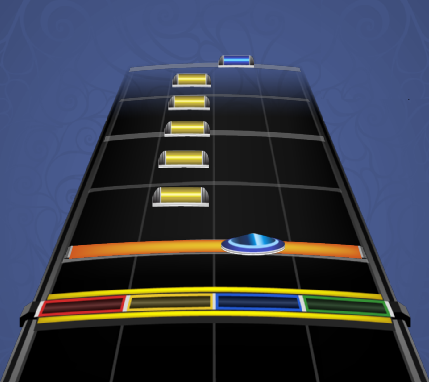
Figure 1 shows an expert drum fill in Reaper with added yellow, blue and green tom markers for Pro drums. Figure 2 shows a portion of the drum fill in the RBN Preview window in Reaper.
|
| Figure 1: Expert drum fill with tom markers. |
|
| Figure 2: Expert drum fill in the RBN preview window. |
Drum Rolls
There are two kinds of drum rolls for both Pro and standard RB Drum Modes.
Standard Drum Rolls are authored on note 126 (F#8).
They work similar to fills where you start the roll lane where the first note is authored, and you end the roll lane so it doesn’t overlap the last note in the roll.
Special Drum Rolls are authored on note 127 (G8).
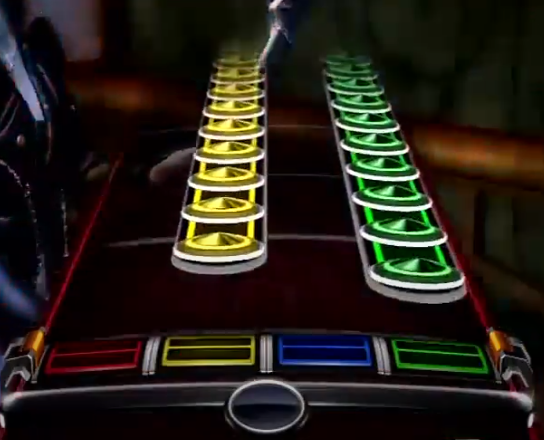
They are used for cymbal swells and allow the player to do a roll that is divided between two pads. It is authored the same way as normal rolls, but should only be used for special instances. A good example would the cymbal swells at the beginning and the end of The Beast and the Harlot (Figure 3).
C3 note: Many people have found these two note rolls to be unfairly strict and hard to combo, so consider charting cymbal swells as a one lane swell (usually on Green cymbal).
|
| Figure 3: "The Beast and the Harlot" cymbal swells. |
Drum roll rules
- Don’t author a fill over a drum roll.
- Drum rolls should be saved for instances where the drummer is playing way too fast on one pad for our kit to pick up.
- C3 note: Even if the drummer plays extremely fast (for example 64ths or 128ths with the help of ghost notes and pad rebound), you might still have problems comboing the part if charted too quick even when covered by a roll lane. Keeping these kind of ultra fast parts as 32ths inside the roll lane is usually the best way to go.
- Try to avoid stretching rolls out over multiple pads (ex. Quick descending tom rolls). It ends up looking poor in game. It’s best used on super fast and/or out of time rolls on individual toms, snare, or cymbals.
Note: Markers can be used in different difficulties depending on velocity. If you want to use rolls on Hard difficulty, author your markers with a velocity between 50 and 41. Anything below that, and Magma will report a note spacing error upon building.
How to Make a 2x Kick Drum Chart
| C3 Author: | Bansheeflyer. |
| Source: | C3 Discord / Authoring / Pinned Messages. |
1. Create your 2x chart in the PART DRUMS track.
2. Duplicate the drum track. Right click on the PART DRUMS track and then click Duplicate tracks in the context menu (Figure 4).

|
| Figure 4: Duplicate the PART DRUMS track. |
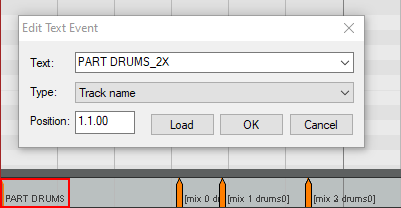
3. In the duplicate track open the MIDI and double click on the text event PART DRUMS. Change the name to PART DRUMS_2X and click OK.(Figure 5). You can double click the track name and change it too if it helps you remember which version is which (Figure 6).
|
| Figure 5: Change PART DRUMS text event to PART DRUMS_2X. |

|
| Figure 6: Re-name drum track PART DRUMS_2X. |
4. Use CAT's 2x reduction action to help create your 1x version in PART DRUMS (Figure 7).

|
| Figure 7 CAT - Reduce 2x bass pedal. |
5. Export the MIDI as you normally would. Magma will then auto-detect a 2x chart and produce two CON files.
Expert
- Expert Gems are MIDI notes 96 (C6) to 100 (E6).
- The general philosophy of Expert Drum authoring is that rhythmically, it is a literal transcription of the actual drum performance. From there, we adjust the gems to best fit the Rock Band kit.
A general template for mapping the drums is:
| Gem | Rock Band Kit |
|---|---|
 (Green) (Green) |
Crash Cymbal or Floor Tom |
 (Blue) (Blue) |
Ride Cymbal or Rack Tom 2 |
 (Yellow) (Yellow) |
Hihat or Rack Tom 1 |
 (Red) (Red) |
Snare |
 (Orange) (Orange) |
Kick |
Exceptions
Obviously, there will be a lot of exceptions, so here are some common ones that we’ve run into:
Open Hihats on Blue. If it makes sense sonically, and if there aren’t a bunch of blue Tom or Cymbal gems in a section of music, an open hihat can be authored on blue. By "making sense sonically," we mean that there is a clear distinction between the open and closed hats. For example, Rush and The Police feature very tight and methodical drumming, so this approach works great for these bands (Figure 8). However, other drummers might gradually open and close the hats over the course of a verse. In the later case, it doesn’t make sense to make a distinction between when the hats are open vs. when they are closed. A section of a song might be cluttered with cymbals or toms that require the blue pad be used. In this case, it’s best to keep all hats, open or closed, on yellow. C3 note: Open hi-hat on blue is not for subtle changes in how open the hi-hat is.

|
| Figure 8: "Subdivisions." Open hi-hat on blue. |
"Disco" beats, or the "16 beat". Some songs feature 16th notes on the hihats (think “Run to the Hills” by Iron Maiden). On a real drum kit, the drummer would play the hihat pattern by alternating both hands on the hats and hitting the snare with the right hand on beats 2 and 4 (Figure 9). This is difficult to do on the Rock Band kit, so we have a drum mix event that allows authors to put the hihats on red and the snare on yellow ((Figure 10) more on drum mix events later). It’s worth listening to make sure that the drummer doesn’t actually hit the hihat simultaneously with the snare, because in some cases, the drummer is able to play all the 16th notes with the right hand without alternating. In this case you shouldn’t use the "disco flip" text event.
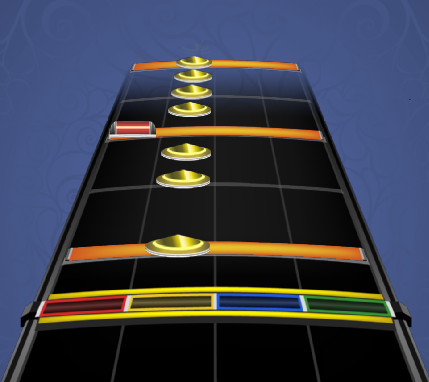
|
| Figure 9: "Run to the Hills" disco beat on Pro drums. |

|
| Figure 10: "Run to the Hills" disco beat with hi-hats on red and snare on yellow. |
Hihats on Green. In the rare case that the left hand is playing at least 2 different toms or percussion while the right hand rides on the hats, it is ok to put the hihat gems on green, which frees up the left 3 pads to be played with the left hand (Figure 11). In a similar vein, the ride cymbal can be authored on green if you need to free up the other pads for left hand action. C3 note: hi-hat on blue is also an option (Figure 12).

|
| Figure 11: "Don't Stop Believin'." Hi-hat (green), tom (yellow) and tom (blue). |

|
| Figure 12: "Feeling This." Hi-hat (blue), percussion (yellow cymbal) and open hi-hat (green). |
Snare Flams. A "flam" is when a drummer strikes one drum with both hands, with one hand trailing slightly (usually the left), thereby giving the hit a fuller sound. We author snare flams as a simultaneous hit on red and yellow in order to show the player that both hands should be used (Figure 13). The yellow gem won’t have any mute/unmute effect on the snare stream - it’s authored that way to get both hands involved. This technique is also good for tom flams: even though both hands hit the same tom, we would author the hit on both yellow and blue (or blue and green) to force the player to use both hands.

|
| Figure 13: "You Really Got Me." The iconic opening snare flam. The faded yellow gem is used to represent a tom marker. |
Crash Cymbals. Crash cymbals can be authored on green, blue or yellow depending on the circumstance. For example, during a chorus the drummer is riding the crash cymbal, but hits another cymbal to accent the beginning of the next 4-bar chunk. In this case, we might have a series of green gems, with the accent crash falling on blue. Many drummers will hit 2 cymbals at once, to add extra emphasis. To replicate this emphasis on the Rock Band kit, we’d author the double crash hit on green and yellow.
RB Limitations
There are also circumstances where we fudge the transcription so that the song is satisfying (and occasionally even possible) to play on the Rock Band kit – occasionally there are things that are relatively simple to play on a real drum kit that don’t always translate well to ours. Here are some of the more common instances:
Fudging tom pitches during fills. Be aware that if the drummer is doing rolls using multiple toms, you might run into a pattern that requires the right hand to cross over the left. It’s pretty difficult to cross hands going from green to blue, or even blue to yellow, so consider being nice and intentionally fudge the pitches of the toms so that it’s possible to play on the Rock Band kit. A good example of this would be when a drummer plays a long fill using a kit that has six toms. Obviously, our drum has only 3 toms, so if you want to capture the epic feeling of such a fill, you’ll need to “wrap” back around the kit, going from green back to yellow. In this case, it helps to set up the “wrap” by sending the left hand to yellow first, thus avoiding the need to cross hands. At faster tempos, this inaccurate transcription of tom pitches will be less noticeable. At slower tempos, however, the fudged pitches will be more noticeable and crossing hands will be easier, so feel free to author the section exactly as it was played.
Open Hihats on the upbeats. A common beat that we come across is played by striking the hihat on every 8th note - but closing the hats on the downbeat and opening them on the upbeat - giving the beat a syncopated feel. Authoring this beat as an alternating yellow and blue pattern - or even as a string of 8th notes all on yellow - may make the player feel disconnected from the audio. A better way to author this kind of beat is to place yellow or blue gems ONLY on the upbeats.
De-emphasized drum hits. Be aware that details that can be heard when listening to a soloed drum mix don’t always translate well when playing with the rest of the band. A common example of this is when you can hear the drummer lightly tapping a crash, ride or hihat cymbal in between the more heavily emphasized downbeats. When playing such a drum part in-game, the extra 8th notes may be detracting from an intended quarter note groove. Similarly, you may hear a lot of accents and details in the soloed snare or kick stream that can’t be heard in the entire mix. Again, the author should listen to the groove as represented in the full mix so that the authored part doesn’t feel overcrowded with seemingly arbitrary gems.
Double Bass Pedals. In songs that feature double bass pedal work, there are a couple of different ways to approach the authoring – choosing just what the right foot is doing as the playable part, or finding an interesting and appropriate way to reduce a constant stream of kick drum hits into a pattern just the right foot can play. Be aware that a real kick pedal contains mechanisms that allow for a speedy, constant stream of bass drum hits, while too many kick drum gems in a row in Rock Band leads to fatigue, so let the tempo of the song inform your authoring. Note: As the Rock Band kit does allow for 2 bass pedals to be used, you are allowed to release a version of your song, labeled "Song Name(2x Bass Pedal)", which contains all the kicks, so long as there is a version playable with one foot.
All done with Expert? Copy/drag the completed gems to the next octave down and begin modifying those gems for Hard. C3 recommends using CAT to reduce drums from Expert to Hard.
Hard
Hard Gems are MIDI notes 84 (C5)to 88 (E5)
- Note: when reducing gem complexity for ANY level, consider that some gems carry more weight, scoring wise, than others. Failing to hit a series of kick gems will fail the player out slightly sooner than missing a series of snare gems. Cymbal and tom gems are weighted the least, so you can miss more of those before you fall to the bottom of the crowd meter.
The Hard level functions mainly as a way to begin introducing the tools one needs to become an expert player, but with many of the details removed. Here is a list of the more important concepts that are introduced in the Hard level of drumming:
- Complete limb independence. When the right hand is playing a constant rhythm, kicks and snares can now fall in between those right hand gems.
- Alternating hands to play rolls. The player is introduced to the concept of playing 16th note rolls on one or multiple pads, by alternating hands. Such passages should be authored only if they last a beat or two. The Hard player shouldn’t be expected to nail these passages immediately, so the player shouldn’t fail when stumbling through them. Avoid authoring 16th note rolls when the song is at 140bpm or above.
- Kick drums paired with off-beat crashes. Continue re-enforcing the idea quarter note grid. Hard should still be less dense with kick gems than expert, though, so there should still, often, be crashes not paired with kicks.
- Faster right hand timekeeping. Hard players will need to begin developing technique that allows them to hold down a fast rock beat. The upper threshold for playing a constant stream of 8th notes at this difficulty is about 170bpm.
Within each song and style of drumming you should be able to find nuances throughout the entire Expert song that when removed, make for a manageable Hard level. Here’s a list of common things one can do to turn an Expert level into a Hard level:
- Thin out the kicks until they number halfway between Medium and Expert. A good first step is to remove kicks on adjacent 8th or 16th notes.
- If the original drummer put kicks during their fills, remove them.
- If a section of the song is filled with little snare accents, remove about half of them in a way that is consistent throughout the entire song.
- For fast drum rolls, you can trim off a hit or two to make it start on an 8th or quarter note grid line. 16th note rolls with an uneven number of hits require an extra bit of advanced reading to nail, so even them out.
- Require less hand motion. For instance, if crash happens right after a snare flam, turn the snare flam into a one-hand hit so that the right hand doesn’t need to move so fast to the crash. The rhythm and feeling of connectedness to the sound is preserved, but less motion is required.
- If crashes are authored to multiple pads on expert, try putting them all on one color for hard. It makes for one less thing to keep track of.
- Eliminate anything that requires the player to quickly cross one hand over or under the other.
- Un-flip any "Disco" beats, or "16 beats." That is, put the hihat gems back on yellow, snares back on red, delete the in-between 16th notes, and add a yellow hihat gem above the snare gem. Now the passage can be played as a regular rock "8 beat" (Figure 14).
- Don’t author double crashes unless there is plenty of empty space around them so the player can prepare (Figure 15).
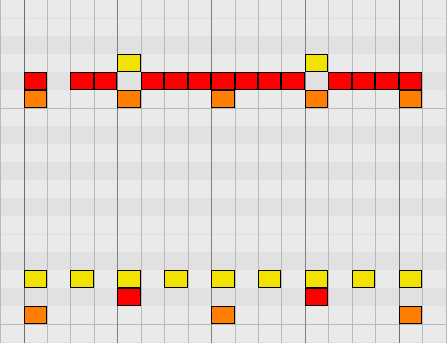
|
| Figure 14: "Run to the Hills." Disco beat un-flipped on Hard. |

|
| Figure 15: "Metal on Metal." Double crash with quarter note space. |
Reminder: when thinning out the Expert gems to turn them into a Hard level, be as consistent as possible, measure-to-measure, as to what you remove. This will make the song feel cohesive.
All done with Hard? Copy/drag the completed gems to the next octave down and begin modifying those gems for Medium. C3 recommends using CAT to reduce drums from Hard to Medium.
Medium
Medium Gems are MIDI notes 72 (C4) to 76 (E4)
The general philosophy of a medium drum level is that the very basics of rock drumming are introduced. The player will learn how to use both the hands and foot at the same time. All other details are stripped down so that the player experiences what is essentially the skeleton of the drum part.
Here are some rules and guidelines we have about the Medium level authoring:
- No kicks or snares in between hihat/ride (ie, right hand time keeping) gems. We aren’t expecting the player to have complete limb independence by this point.
- No 3-limb hits (ie. Simultaneous kick, snare, and crash all at the same time).
- The player’s right hand shouldn’t be expected to keep time with 8th notes if the song is 140bpm or faster. For songs faster than that, reduce right hand time keeping to quarter notes. Note: this will also mean that there are less places for kick drum gems.
- If the song is at 170bpm or above, one kick gem per measure is enough.
- Assume that the player, when presented with a stream of consecutive gems on one color, will attempt to hit them all with one hand. We don’t require the player to know how to hit a run of 16th notes by alternating hands, so reduce fills and rolls to 8th notes, or less for faster songs.
- In medium, the player should be introduced to the concept that crashes are usually emphasized with a matching kick drum. Crashes on downbeats should get a kick gem underneath them. Syncopated or off-beat crashes are trickier, so leave them with no kick gem underneath.
- At faster tempos, remove gems immediately after a crash to give the player time to reset his/her hand position.
- For songs above the 100-110bpm range, consider only authoring kick gems on quarter notes.
- Differentiating open and closed hihats works well for some Medium songs, but not all. Often enough, tempo will be the deciding factor in deciding how to treat open hihats.
- Triplets are usually best reduced to quarter notes, rather than simply removing every other gem – consider that either approach can radically change the feel of a passage.
General Tips
Medium players tend to get into a groove pretty easily when the beat is predictable and doesn’t vary. Any time the rhythmic feel of a beat gets complicated by syncopation, polyrhythm, etc., pick out the main hits of that passage, and really try to thin out the gems around those hits. The player needs to learn what the intended feel is before worrying about the filler gems.
Remember that some fills may have an accented pattern other than just a stream of 16th notes. For instance, the drummer may accent every 3rd 16th note by striking the drum harder, or may reach out and hit a few different toms during a long snare fill, etc. Rather than simply reducing the fill to a stream of 8th notes, try and find the intended rhythm of the fill and simplify the pattern in a way that retains that nuance.
All done with Medium? Copy/drag the completed gems to the next octave down and begin modifying those gems for Easy. C3 recommends using CAT to reduce drums from Medium to Easy.
Easy
Easy Gems are MIDI notes 60 (C3) – 64 (E3)
The general philosophy for Easy is that it’s like Medium, but the player isn’t expected to use all 3 limbs in any given song section. No gems should be paired with a kick.
Here’s a list of ways to reduce the Medium gems to create an Easy level.
- In Easy, the beat can usually be reduced so that the player either is playing a 2-hand beat with no kick, or a beat with just kick and snare. Once in a while, a section makes sense to be reduced to kicks and toms/cymbals. At no point should the player need to play a full 3-hand rock beat. A general guideline to follow is that less intense sections should be authored a kick/snare beat, and more rocking sections should be authored as a 2-hand beat.
- Author crashes so that they don’t have kicks underneath – kick/crash pairing should be saved for Medium. If a kick/snare section begins with, or contains musically important crash accents, author the crashes instead of the kicks.
- Depending on tempo, you may want to reduce Medium’s 8th note fills to quarter notes.
- If the song is at 170bpm or above, one kick gem per measure is enough.
- Let’s say you took a verse as it was authored in medium, and removed the hihats, leaving kick and snare. The beat may be too sparse to be interesting. In this case, it’s okay to author an extra kick drum per measure if it’s on a quarter or eighth note grid.
- For important off-beat accents or other more complex rhythms, consider thinning out the gems around the accents even more so than Medium.
- Since some sections will have no hihat gems, there may be space for yellow tom gems during a fill. This can make it slightly easier for the player to read and play, without having to reach as far.
Visual Template for Drum Animations
| C3 Author: | Bansheeflyer. |
| Source: | C3 Discord / Authoring / Pinned Messages. |
Here is a visual template for drum animations. Each color corresponds to the piece's respective color in-game (Figure 16).
"Percussion" is pointing to the miscellaneous percussion mounted right above the kick. This is typically a cowbell. Please note in Rock Band 3 only "Percussion RH" works, "Percussion LH" does not.
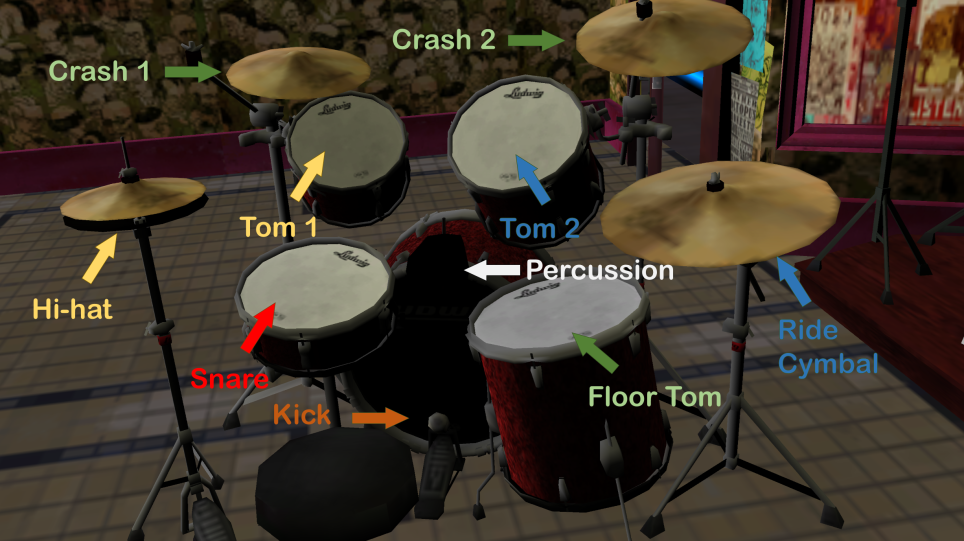
|
| Figure 16: Visual template for drum animations. |
Animations
Drummer Hand and Foot Animations are authored as follows:
| MIDI / Note | Animation |
|---|---|
| 51 D#2 | Floor Tom hit w/RH |
| 50 D2 | Floor Tom hit w/LH |
| 49 C#2 | Tom2 hit w/RH |
| 48 C2 | Tom2 hit w/LH |
| 47 B1 | Tom1 hit w/RH |
| 46 A#1 | Tom1 hit w/LH |
| 42 F#1 | Ride Cym hit w/RH |
| 41 F1 | Crash2 Choke (hit w/RH, choke w/LH) |
| 40 E1 | Crash1 Choke (hit w/RH, choke w/LH) |
| 39 D#1 | Crash2 (near Ride Cym) soft hit w/RH |
| 38 D1 | Crash2 hard hit w/RH |
| 37 C#1 | Crash1 (near Hi-Hat) soft hit w/RH |
| 36 C1 | Crash1 hard hit w/RH |
| 35 B0 | Crash1 soft hit w/LH |
| 34 A#0 | Crash1 hard hit w/LH |
| 32 G#0 | Percussion w/ RH |
| 31 G0 | Hi-Hat hit w/RH |
| 30 F#0 | Hi-Hat hit w/LH |
| 27 D#0 | Snare hit w/RH |
| 26 D0 | Snare hit w/LH |
| 25 C#0 | Hi-Hat pedal up (hat open) w/LF. The hat will stay open for the duration of the note. The default is pedal down (hat closed). |
| 24 C0 | Kick hit w/RF |
| 28 (E0) | A soft snare hit with the left hand |
| 29 (F0) | A soft snare hit with the right hand |
| 43 (G1) | A ride hit with the left hand |
| 44 (G#1) | A hit on crash 2 with the left hand |
| 45 (A1) | A soft hit on crash 2 with the left hand |
To author drum animations, start by copy-pasting the Expert gems so that the kick drum is on C0. For most songs, you can then make an approximation of the animations by spreading the green gems to "RH Crash 2 hard," blue to "RH Ride," yellow to "RH Hihat," and red to "LH Snare." From there, the process is self explanatory.
Here’s a list of tips to help make for an interesting animation track:
- Make sure the crashes used are as varied as they are in the recording. Don’t forget to author double crashes into the animations, even if the playable gems don’t have any.
- If the drummer is riding on a crash, try alternating between soft and hard hits to make the animation look less robotic.
- There is no way to emphasize accents in snare or tom rolls the way that there is for cymbals. Instead, one way to make the drummer avatar look like it is accenting something is to remove the note for that hand before the accent. That way, the animation system is given more time to lift that hand higher before the strike. Another way to work around this is to experiment with combinations of paradiddles and double strokes, again giving the accenting hand more time to rise before a strike.
- When authoring a flam, you can achieve a more realistic look by making the left hand fall slightly after the right.
- To add extra character to the animations, experiment with uncrossing the hands so that the left hand might hit the hihat or crash 1 while the right hand hits the snare. Techniques like this work best during sections with broken rhythms more so than with a regular rock beat.
- The note controlling the hihat pedal (C#0) opens the hihats for the duration of the note. For extra realism, try making the left foot tap to the beat when the drummer isn’t playing the hihats (unless, of course, the drum part is sparse enough that a viewer could absolutely hear that the drummer wasn’t pumping the pedal).
Character Animations
Text Events for Drum Animations
| Text Event | Drum Animation |
|---|---|
| [idle_realtime] | Character is idling in real time, not synced to the beat. Use this for the intro & ends of songs or anywhere else you don't want a non-playing character bopping to the beat. |
| [idle] | Character is idling normally (not playing). |
| [idle_intense] | Character is idling in an intense manner. |
| [play] | Character is playing. |
| [mellow] | Character is playing in a mellow manner, might hit softer. |
| [intense] | Character is playing in an intense manner. |
| [ride_side_true] | Drummer uses Max Weinberg's side swipe when hitting the ride slowly. |
| [ride_side_false] | Drummer hits the ride normally always. |
Drum Fills
Drum Fill Lanes are authored on MIDI notes 120 (C8)t0 124 (E8)
- For most songs, 1 measure fills every 4 bars make for an appropriate pacing of fills. Common exceptions are when a song is very fast, in which case you may want to author a 2 measure fill every 8 bars, or when a song is very slow, in which case a half measure fill every 2 bars will do.
- Fills should also line up with important transitions within a song. For example, if a verse has an extra 2 bars tacked on the end before the chorus, you should author the fill so that it ends at the chorus, rather than sticking to the "every 4 bars" formula. Fills should end so that it matches the style of the song.
- For instance, some songs (think the chorus from Motley Crue’s "Kickstart My Heart") emphasize the last upbeat of a measure rather than the "1," giving the song a syncopated feel. In this case, the drum fill should end on that upbeat, or "anticipation," causing the game to place the crash in a way that matches the original drummer’s performance.
- In some cases, there might be a band-wide pause before the next section. To preserve this nuance, consider ending the fill at the pause as well.
- There is another school of thought when it comes to authoring Drum Fills. Sometimes, a song may have a really fantastic recorded fill, or an interesting groove that you may want to force the drummer to play. If a Drum Fill lane is placed over this, the player will be unable to play the authored gems. If you ever come across a measure of drums that really grabs you, feel free to not author Drum Fill lanes on that bar. This is totally an artistic decision, and one that has the ability to improve or hamper gameplay and musicality, so make sure it works before finalizing it.
- Fills are special in that it really allows the player some freedom of expression. With this in mind, it can be fun to sparingly author a double-length fill if it fits the song. A good place for such a fill might be after a long build into the last, raucous chorus of the song.
- Fills are also a good way to end a long section of rest for the drummer. It means the player gets a little drum solo before the beat comes back in.
- Drum Fills cannot occur in Drum Solo Sections.
- Fills are fun, obviously, so it may seem natural to want to put them at the very end of any given song. But consider that the written ending may actually be more fulfilling to hear for the rest of the players, or may contain a rhythm in lock-step with the rest of the band that makes for its own great sounding end. Try not to be indulgent and overwrite a great song ending for every song!
Since it is the drum fill that enables a drummer to deploy overdrive, you may want to avoid authoring a drum fill right before a long rest section for the drummer, to save the player from wasting overdrive.
When authoring the drum fill, the drum fill should end right at the moment where the final hit is expected to be. Don't extend the drum fill past the bar line so that it "covers" the first note of that new measure, for instance. That will actually ruin the drum fill.
Drum Mix Events
C3 note: Unless you work with multitracks, you only need to use the drums0 and drums0d events; drums0 being the default setting that makes your chart playable as normal and drums0d activating disco flips (switching Red and Yellow) on Pro Drums. For a quick guide how to set this up properly, check Figure 17 below:

|
| Figure 17: Drum mix events. |
To switch between normal and disco flipped drums on Expert Pro Drums, simply place a [mix 3 drums0d] text event to turn disco flip on or [mix 3 drums0] to turn it off any time in the song (Figure 18). The reason this event exist is that you should chart two hand 16th hi-hat patterns to Red and snare hits in these patterns to Yellow on Legacy Drums so it is playable without needing to cross arms, but you also want people who play Pro Drums to be able to play these parts like they are played on a real drum set.

|
| Figure 18: Disco flip on [mix-3-drums0d] event. |
Since bands can record and mix a drum kit in many different ways, we need drum mix events to tell the game which drum pads unmute which audio streams for each difficulty. The format of a drum mix is this:
[mix <difficulty> drums<configuration>]
<difficulty> is a value, 0 through 3, where 0 is Easy, 1 is Medium, 2 is Hard, and 3 is Expert
<configuration> refers to the configuration of the drum audio streams.
Here's a list of supported stream configurations: ("Else" refers to the stream that contains cymbals, toms, room mics and percussion.)
Drum Mix 0 and its variants: One stereo mix for the entire kit.
- drums0: One stereo stream for the entire kit. Hitting any pad or pedal will unmute the stream.** drums0d: drums0, but with yellow acting as the Snare, and red becoming an "Else" pad, which makes it easier to play a fast 16-beat, "disco" style. The only reason why we need such a configuration for a single stereo stream is that the "d" variant also changes the scoring so that now the yellow pad is weighted more heavily than the red.
Drum Mix 1 and its variants: Mono Kick, Mono Snare, Stereo Kit
- drums1: mono Kick, mono Snare, stereo "Else"
- drums1d: drums1, but with yellow now unmuting the Snare stream, and red unmuting the "Else" stream.
- This mix event is no longer supported in RB3/RBN2 drums1easy: drums1, for use in sections in the easy difficulty, where there are no "Else" gems to unmute the "Else" stream.
- This mix event is no longer supported in RB3/RBN2 drums1easynokick: drums1, for use in sections in the easy difficulty, where there are no Kick gems to unmute the Kick stream.
Drum Mix 2 and its variants: Mono Kick, Stereo Snare, Stereo Kit
- drums2: mono Kick, stereo Snare, stereo "Else"
- drums2d: drums2, but with yellow now unmuting the snare stream, and red unmuting the "else" stream.
- This mix event is no longer supported in RB3/RBN2 drums2easy: drums2, for use in sections in the easy difficulty, where there are no "Else" gems to unmute the "Else" stream.
- This mix event is no longer supported in RB3/RBN2 drums2easynokick: drums2, for use in sections in the easy difficulty, where there are no Kick gems to unmute the Kick stream.
Drum Mix 3 and its variants: Stereo Kick, Stereo Snare, Stereo Kit
- drums3: stereo Kick, stereo Snare, stereo "Else"
- drums3d: drums3, but with yellow now unmuting the snare stream, and red unmuting the "else" stream.
- This mix event is no longer supported in RB3/RBN2 drums3easy: drums3, for use in sections in the easy difficulty, where there are no "Else" gems to unmute the "Else" stream.
- This mix event is no longer supported in RB3/RBN2 drums3easynokick: drums3, for use in sections in the easy difficulty, where there are no Kick gems to unmute the Kick stream.
Drum Mix 4 and its Variants: Mono Kick, Stereo Kit (including Snare)
- drums4: mono Kick, plus Snare and "Else" mixed into one Stereo stream.
- drums4d: drums 4, but with yellow scored as a Snare, and red scored as an "Else" gem.
- This mix event is no longer supported in RB3/RBN2 drums4easynokick: drums4, for use in sections in the easy difficulty, where there are no Kick gems to unmute the Kick stream.
Pro Drum and Disco Flip
Because of the addition of Pro Drums, a new set of disco flip mix events have been added.
When we have fast 16th notes played on the hihat, we use the “drums_d”, or disco flip, to switch the hihat and snare pads, making it easier to play. In rare cases the player is required to play the 16th notes on a regular drum pad with accented hits on the yellow cymbal/tom. In this case, we want a disco-like beat, but one that keeps it playable in Pro Drums mode (ie. does not "unflip" the snare and hi-hat). In the case of Pro Drums, the player is required to play the hihat part on the hihat attachment to the RB drum kit. In these cases, we must use the additional command “noflip”:
- drums0dnoflip
- drums1dnoflip
- drums2dnoflip
- drums3dnoflip
- drums4dnoflip
In addition to the new disco flip events, the following mix events are generated by the game and are no longer needed:
- drums#easy
- drums#easynokick
Example of using Mix Events
So, let's say you have a drum stream configuration that consists of a mono Kick, stereo Snare, and stereo "Else." At the start of the "PART DRUMS" MIDI track, spread out over the first four 16th notes, you will need to enter 4 new events:
- [mix 0 drums2]
- [mix 1 drums2]
- [mix 2 drums2]
- [mix 3 drums2]
A Few Final Tips
Make sure to check out Common_Authoring_Mistakes and Drum Review Process after you author.
