Audio Setup
From RBN/C3 Documentation
Stems are not required for C3 customs. For "normal" audio (i.e. a full mixdown, like an MP3), we put the full audio track in TRKS, which is the background track that is always played no matter what, and each instrument's "stem" is only silence.
Contents
What are Stems?
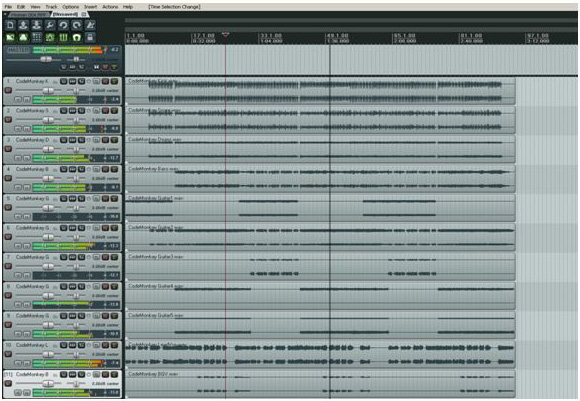
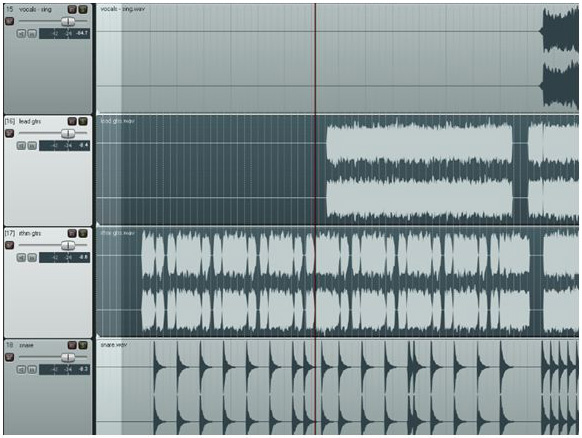
Stems are Audio files containing individual instrument parts that when all played together at the same volume sound like the final mix of a song. Here’s a batch of stems inserted into a Reaper project (Figure 1).
|
| Figure 1: Audio stems in Reaper. |
You’ll notice that all the stems are exactly the same length. It’s important that all the stems for a song have the same start point, so that all the parts are easily aligned for authoring and importing via magma. It’s totally fine to have a big chunk of silence at the start of a stem, the important thing is make sure every stem starts at the same time.
All stems should be 16 bit, 44.1k .wav files. All stems should have any needed volume rides, panning and fx processing baked in. This means that the stems should contain all the audio from the final album mix, and should sound exactly like the album mix when all played together. For mastering purposes, feel free to do any EQ, spatialization, and compression needed and bake that into the stems, but please avoid the heavy-duty limiting that you might do on a final 2-trk master.
For the game, we prefer proper endings instead of fade-outs, so for songs where the original mix faded out at the end, please don’t fade out the stems, let them play out ‘til the end and use what’s on the tracks to create a proper ending if one doesn’t exist.
C3 note: you can also attempt to reverse a fade-out in a track if the opportunity presents itself. Check out this guide written on the C3 Forums: http://customscreators.com/index.php?/topic/11011-tutorial-how-to-reverse-a-fade-out-with-audacity
Along with your stems, it’s important to write out a Lyric Sheet and save it in plain text (.txt) format. This will help with vocal authoring down the line.
It is vital that stems are mixed as specified, without any missing elements from the album mix, as these stems will be the basis for how your song sounds in Rock Band.
Stem List
In game stems: All stems should have the same start point and when played together they sound as close to the original mix as possible. Here are the stems needed for Rock Band:
- mono or stereo Kick Drum stem
- mono or stereo Snare Drum stem
- stereo Drum Submix stem – a submix of everything else in the kit besides Kick & Snare, including Hats, Cymbals, Toms, Overheads, Room, etc…
- Note about drums: It's fully understood that when recording a real kit there will be bleed between the Kick, Snare and Drum Submix stems. That’s acceptable. Try isolate them as much as is practical, without harming the overall sound. Additionally, if the Drums were recorded as a single stereo file or as 2 files, a kick drum and overhead mics, that is also acceptable.
- mono or stereo Bass Guitar stem
- separate mono or stereo Guitar stem for each guitar part. The song author will figure out which guitar parts would be best to play in the game, mix together a ‘playable’ guitar track, and remix the remaining stems back into the backing tracks.
- separate mono or stero Keyboard stem for each keyboard track. Similiar to the guitar part, the author may need to make a master playable track out of multiple individual tracks.
- mono or stereo Lead Vocal stem – a comp of the lead vocal track.
- mono or stereo Background Vocals stem - a comp of any bg vocals/harmonies, etc.
- stereo Backing Tracks stem – a submix of anything else in the song, not already broken out above: keyboards, percussion, accordian, vocal harmonies, etc…
Other stems for reference only: these will NOT be played back in the game, but are for reference only.
- mono Dry Vocal stem for lipsync and phoneme detection. This should have no fx processing and whenever possible should be one single human voice at any one time (ie: try to avoid double-tracking or harmonies). We'll run this file through our analysis software and the cleaner/dryer it is, the better it works. This audio is used for both the Solo vocal part and Harmony 1 if harmonies are authored.
- mono Dry Vocal Harmony This is used for Harmony 2 and 3 if if harmonies are authored, and should be the same format as the Dry Vocal file. If you have multiple harmonies you may create separate audio files for Harmony 2 and Harmony 3, but in the vast majority of the cases a single harmony dryvox is sufficient.
- stereo CD reference mix -if you used one as a reference when re-creating your stem mix.
- stereo Full Mix of the stems
How to make Stems
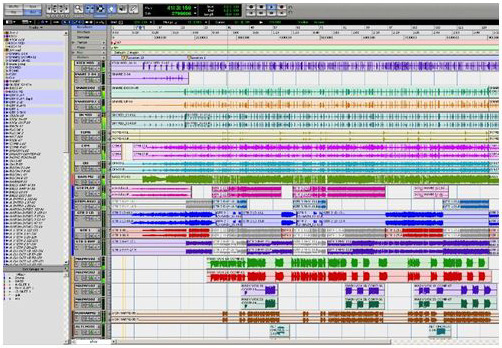
Open up your band’s Recording session project file in whatever program you used to record. Here’s an example of a session in ProTools (Figure 2):
|
| Figure 2: ProTools session. |
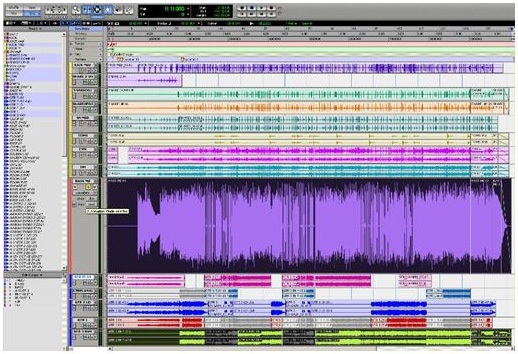
Set the start and end point for your stems. This is easily done by selecting the track that begins first, and the track that ends last in your song. In this case, I’ve selected the bass and the rhythm guitar tracks. You’ll see the start and end points reflected at the top of the window (Figure 3).
|
| Figure 3: Start and end points for stems in ProTools. |
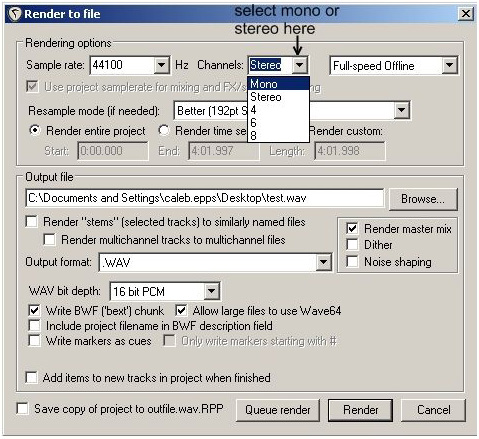
Solo the tracks to be included in the stem, and bounce to disk (also known as “Render” in Reaper). Select 44100hz for your sample rate, and 16 bit for bit depth (Figure4).
|
| Figure 4: Audio Export. |
Solo the tracks to be included in the next stem you need, but don’t change the start and end points. Render again, and repeat this step for all needed stems.
How to combine multiple instruments stems into a playable stem.
It’s not uncommon for a song to have multiple parts of the same type of instrument (most commonly guitars) recorded to different tracks. If you’ve followed the instructions above, you should have individual stems for each one of these parts. You’ll need to combine the most prominent and fun to play parts into one audio file, which you will use to author the in-game guitar gems.
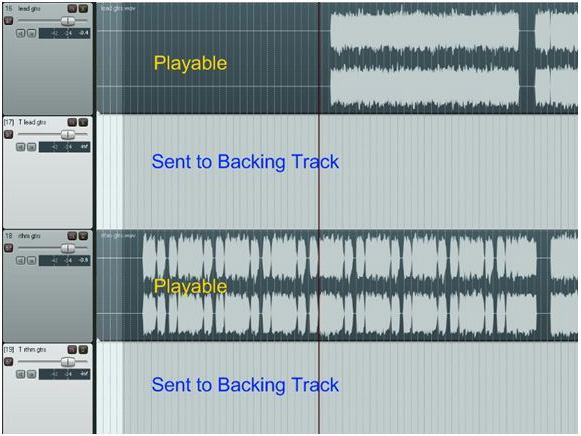
Here’s an example of 2 different guitar stems for a song, loaded into REAPER. One contains the lead guitar part, the other contains the rhythm guitar part (Figure 5).
|
| Figure 5: Lead and rhythm guitar stems in Reaper. |
You’ll notice that just to the right of the edit cursor, the lead guitar part enters while the rhythm guitar is still playing. We can’t author both parts at the same time, so we’ll use the lead guitar for the playable guitar part, and move the rhythm guitar to the backing tracks file. In order to do this we need to make an additional track for each guitar part, so that we can easily keep track of which parts are playable, and which are not (Figure 6). You can add new tracks in Reaper by hitting Ctrl+T (Command+T on Mac). You should also name your new tracks so you can easily keep track of them, at Harmonix, we add a “T” to the start of any track going to the Backing Tracks.
|
| Figure 6: Moving rhythm guitar stem to Backing Track. |
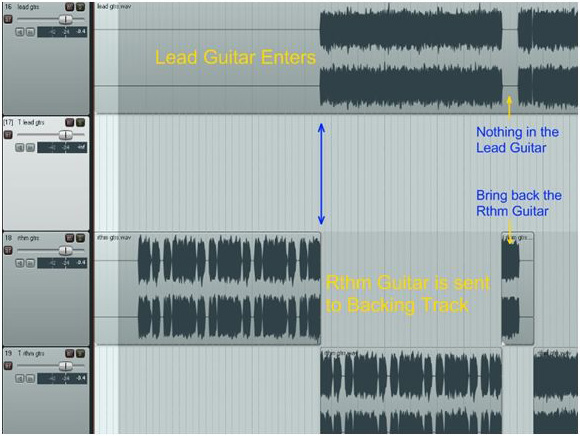
Now we can start to split our rhythm guitar track up and move parts of it to the backing tracks (Figure 7). To make a split in a piece of audio (or MIDI) in Reaper, simply place the edit cursor where you want by clicking on the audio file (you should probably turn snap to grid off by deselecting the magnet icon on the upper-left part of the screen) and hit “S” to split the track. You can then move parts of the audio file either by dragging with the mouse, or with the arrow keys. Be sure not to slide your audio to the right or left when moving it to another track. You can avoid this by holding shift after you start dragging.
|
| Figure 7: Splitting and managing lead and rhythm guitar tracks. |
You’ll notice that later on in the track, when there’s a lull in the lead guitar, we’ve brought the Rhythm guitar back for a brief moment (Figure 7). Whenever you’re doing quick changeovers like this, make sure it makes musical sense, this chunk of rhythm guitar is a complete musical phrase, so we’ve moved it up to the playable track.
|
| Figure 8: Fading between lead and rhythm guitar tracks. |
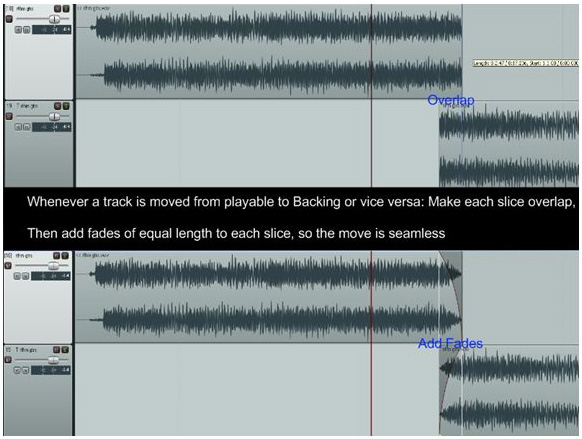
Now that our parts are split properly and placed on their proper tracks, we’ll need to do a bit of clean up. Anytime you split a piece of audio, there’s a good chance that pops or clicks will occur. In order to avoid this in Rock Band, we overlap the two pieces of audio slightly (you can extend the ends of any piece of audio by dragging the edge of the audio in Reaper) and insert fades of equal length on the overlapping parts; A fade-out on the track that’s ending, and a fade-in on the track that’s starting (Figure 8).
You can add a fade to any piece of audio in reaper by dragging the top corner of the audio back into the audio file, kind of like folding over the corner of a piece of paper. As your making a fade, a blue line will extend across the other tracks, marking the start (or end) of the fade, making it easy to be sure that your fades are equal across both tracks.
Make sure you have these fades in place any time you move a track from playable to backing or vice versa.
Once you’ve added fades to each switchover point, you should solo the tracks that will be used in the playable part, and Render, which will make your new playable stem. You should then solo the original backing tracks stem, plus any additional parts to be sent to the backing tracks, and Render your new Backing Tracks Stem.