Mix and MIDI Setup
From RBN/C3 Documentation
Contents
MIXING
RB Mix File Format Suggestions
Audio Stems can be recorded in many different setups and formats, based on how the song was recorded. The most common and suggested format is described below.
Game Mix files (Stems)
All files in this section should be 16bit, 44.1kHz.
| K* | Kick Drum: Mono |
| SN* | Snare Drum: Stereo |
| CYM* | Kit Mix: Stereo (Usually Overhead Mics plus any direct Tom Mics) |
- The game can handle several Different types of Drum mixes, anything from a single stereo combined drum file up to stereo files for each of the 3 Drum files listed above. The Rock Band template file is set up assuming that you have the Drum mix listed above. If your Drum mix is different, please refer to the Drum Authoring Doc and make sure that the drum mix text events in the MIDI file match the format of your drum audio files.
| BASS | Playable Bass Part: Mono (Stereo if using any Stereo Phase or Heavy Chorus effects) |
| GTR | Playable Guitar Part: Stereo |
- When creating stems from your recording session, or when requesting stems from a studio, please make a stem for each individual guitar part. The song author will then pick and choose from those guitar parts, mixing together a new composite stem, the playable guitar part listed above. Any non-playable guitar parts will then be mixed into the TRKS stem.
| KEYS | Playable Keyboard Part: Stereo |
- These should be created the same way as the guitar part.
| VOX | Playable Vocals Part: Stereo |
| TRKS | All Other Instruments and Backing Vocals: Stereo |
Additional reference files
Reference Dryvox: Mono 16kHz (Lead Vocal File with no effects).
- Note that unlike the stem files, this file must be 16kHz and Mono.
- This file is used to generate lip sync, and to create scoring information for the vocal gameplay. In a pinch, you can use a wet vocal track, but both the lip sync animation and the scoring of the vocal track will suffer as a result.
Reference Harmony Dryvox: Mono 16KHz (any harmony vocals with no effects).
- Used the same way as the main dryvox, for any harmony parts if authored.
CD Reference Mix: Stereo.
- While this file isn’t necessary for the game, it's very useful to have a reference mix to ensure that the game sounds as close as possible to the album mix.
Lyrics sheet: It's usually a good idea to prepare a lyric sheet for your song, or to request one from an artist if you're authoring a song for them.
Rock Band Mix vs. CD Mix
Since songs in Rock Band have to contend with game sound effects and the cheering of a virtual crowd, we tend to mix songs slightly louder for the game. Using a good brick wall Limiter, such as the JS: LOSER/MGA_JS Limiter in Reaper, you can get an extra bit of loudness into your files. Set the ceiling to -0.5 dB and adjust your threshold so that the peak reduction is about 2-3 dB on the loudest track, use the same limiter threshold setting on each track to ensure that your mix does not change signifigantly. This will ensure that each of your tracks will be nice and punchy.
We will make a RBN mixing template for use in Reaper available shortly, that comes with a custom mixing macro to import into your actions list (mapped to Shift+M) if you're having trouble getting your tracks loud enough. Used in conjunction with the mixing template project, this macro will normalize your tracks, and apply some light compression and limiting.
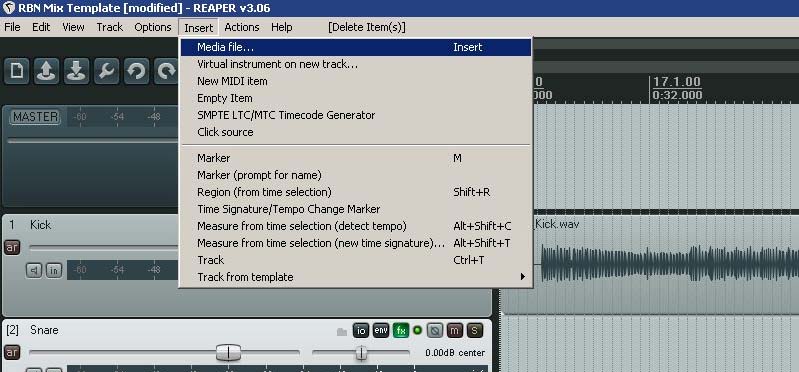
To use the template, first import your stems into the template (Figure 1):
|
| Figure 1: Insert Media file. |
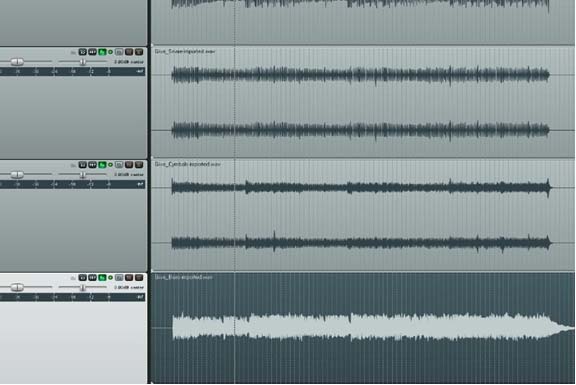
Run the macro, which will convert your stems from this (Figure 2):
|
| Figure 2: Stems before normalization, compression and limiting. |
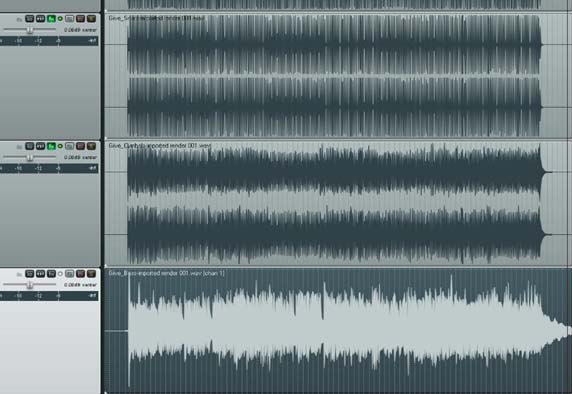
To this (Figure 3):
|
| Figure 3: Stems after normalization, compression and limiting. |
You can then adjust your mix in Reaper, take note of the attenuation (volume) settings that you like, and enter those values into the magma tool.
Mixing Requirements
In order to avoid clipping, all files must be no louder than -0.5db. You can assure this by running all files through a brick wall limiter as the last step of mixing.
Count In
Unless there is a strong count-in in the music, you should add a 2 measure long count-in to the beginning of the TRKS file (in the standard "One, two, One two three four" style). This count in can be a standard, sample based count-in, but is more often crafted from snippets of the CYM track.
If there is no other sound before the count-in, the first beat of the count-in should mark the start of the TRKS file. The tempo for the count in should match the tempo for the first bars of music (Pro Tools and Reaper can calculate tempo based on the length of a selection; select exactly one bar and that will provide an accurate tempo). Be sure to note the tempo for use as a starting point for the tempo map.
For songs that have initial hits prior to the first "real" measure (for example, the drummer plays a short fill one beat before the song starts), you can create a count-in that sounds like "One, two, one two three," and have the 4 be the first playable notes. The important thing is to allow the player enough time to anticipate the tempo of the first measure of the song.
For very fast songs (160 bpm and above) a three measure count-in is necessary. For songs about 210bpm, a four measure count-in may be necessary. The game requires 3 seconds from the beginning of the song to display and remove a player’s gamertag on the track. As a rule, gems should not appear until after this has occurred. Absolutely no gems should appear on the track prior to 2.5 seconds (i.e. in Reaper there should be no gameplay notes prior to 2.5 seconds into your song.)
There is a bug in Audition mode which sometimes hides gems between 2.5 and 3.5 seconds. These gems appear properly in game. As a workaround, restarting the song from the pause menu will show the gems properly.
Instrument files
The Instrument files (K, SNR, CYM, GTR, BASS, and KEYS) must reflect the part that will be played in the game. This file will be muted when a player misses a note in that part. For most Instruments, this is a very simple task, and a straight render (a.k.a bounce) from your DAW session will suffice.
Vocals are not muted and are played throughout the song regardless of the player's vocal performance. However we do render them on a separate audio track to give the player more control over the vocal mix in-game.
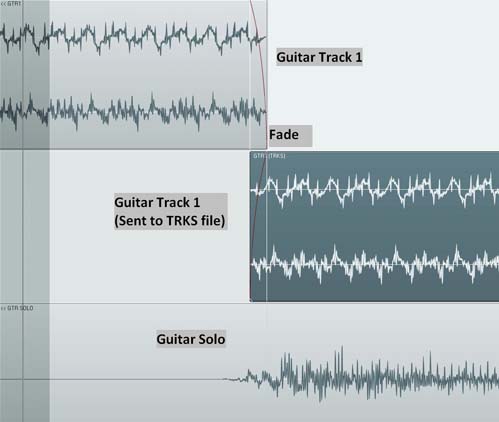
In songs with multiple tracks for the same instrument (usually guitar and keys), you will have to decide which track will be playable at any given time. When you want to make a switch from one track to another in the playable part - for example, when there is a guitar solo recorded in a separate take - you must split your original audio track and move the part of the file that will not be played onto a new Audio track, which will be bounced to the TRKS file (Figure 4).
|
| Figure 4: Managing playable tracks. |
To accomplish this, you can follow these steps:
- Create a new track (Ctrl+T in Reaper) and be sure to name so you can remember it's being sent to the TRKS file
- Click directly on the track in the position where you'd like the changeover to happen (be sure that Grid Snap is turned off), and hit S to splice the track
- . Move the soundfile to be sent to the TRKS file down to the new track
- . Extend the edge of each file so that they overlap slightly (drag the edge of the soundfiles)
- . Add fades (grab the upper corner of each file and drag).
In order to avoid any changes in volume at the switchover point, the fades added should be of equal length at the end of the original track and the beginning of the track for the TRKS file, as shown below. If you want to switch back to the original Guitar Track after the solo, you can do that using the same process.
Making the TRKS file
The TRKS file plays through the entire song, and is not affected by how a player is doing. It contains all non-playable parts and the song count in. When rendering your instrument files, be sure to have any parts that will be in the TRKS file muted.
Mixing Tips/Tricks from the Harmonix Mix Team
- Compression is key, especially for vocals. There’s so much noise going on in the game with the crowd and sound effects, that a subtle or nuanced part in the music can get lost. Compression will make sure that everything in your song gets heard.
- It’s important to make sure that the playable part is the most prominent in the mix. You can go about this a few different ways: turning up the playable part, or lowering the TRKS file. Sometimes, if a song has a lot of parts and you’re frequently switching between them, you can use EQ to slightly reduce the high end (around 6-8khz) of the soundfiles being sent to the TRKS file for that instrument. It should make the playable part cut through the mix.
- Brightness in the mix is important. Since the tracks you’re working with usually will not have gone through the final mastering process, you should run your tracks through a multi-band compressor (like the ReaXcomp in Reaper) and then add a little boost with an EQ at about 8-10k. This will give your mix a little bit of that professional sheen.
- If you want the bass louder in the mix, don’t just turn the bass up - this usually muddies up your mix sound. Try using EQ: bring down the low end (20-60hz), and boost the low mid-range (600-1000hz) of the bass signal. That will help the bass cut through so that a bass player in Rock Band can hear what they’re doing.
- When choosing which parts to make playable, always remember to choose the parts that will be the most fun to play.
MIDI SETUP
MIDI file setup
The song MIDI file contains all the data for the charts for each instrument, the tempo of the song, animation information, and settings for cameras and lighting.
It's important to set up the song's MIDI file before starting to author any instrument parts. Setting up the MIDI file requires 3 steps:
- Tempo Mapping
- Setting up the EVENTS track
- Setting up the BEAT track
After these three steps are complete, you can start authoring your instrument parts.
Pre-Authoring Setup
We recommend using the Rock Band Network Reaper Template file as a starting point for all your songs. It contains all of the necessary elements for a song to run in the game and will allow you to start tempo mapping your song immediately and without additional setup. If you decide to go your own way, the game requires a MIDI file with all appropriate tracks and elements (notes and text events) within those tracks in order for a song to run. Below is a table of the absolute minimum MIDI file requirements for the game
MIDI file minimum requirements
| Track Name | Required Text Events | Required MIDI Notes |
|---|---|---|
| PART DRUMS* | Drum mix events 0-3 | 1 gem (all difficulties) |
| PART BASS* | None | 1 gem (all difficulties) |
| PART GUITAR* | None | 1 gem (all difficulties) |
| PART KEYS* | None | 1 gem (all difficulties) |
| PART REAL_KEYS_X | None | 1 gem |
| PART REAL_KEYS_H | None | 1 gem |
| PART REAL_KEYS_M | None | 1 gem |
| PART REAL_KEYS_E | None | 1 gem |
| PART REAL_KEYS_ANIM_RH | None | None |
| PART REAL_KEYS_ANIM_LH | None | None |
| PART VOCALS* | 1 lyric (aligned with note tube) | 1 Note tube, 1 Phrase Marker |
| HARM1 | 1 lyric (aligned with note tube) | 1 Note tube, 1 Phrase Marker |
| HARM2 | None | None |
| HARM3 | None | None |
| EVENTS+ | [music_start], [music_end], [end] text event | None |
| BEAT | None | C-1Downbeat, C#-1 All other Beats |
| VENUE | None | None |
- At least one of these instrument track, or all the KEYS tracks, are required.
+ In order to Auto-generate the venue track, practice sections are required. See Practice Sections for more information.
Tempo Map
The Tempo Map is by far the most important part of a Rock Band MIDI file. In order to run accurately and allow for quantized instrument authoring, Rock Band requires an accurate tempo map for each song. For electronically produced music, this is a simple task, but for songs recorded organically, either with or without a click track, creating an accurate tempo map requires some work.
The tempo track is most easily referenced from the count-in, the kick drum track or another appropriate track if there are times when the kick drum is not present. If your song has a pretty simple drum beat, there will be some sort of drum beat on the first beat of every measure, usually in the kick drum (if this is not the case, the cymbal track is a good bet as well) Start by setting the tempo for the count in (this should be easy, as every count in follows the same pattern) then for each measure, check that the appropriate drum hit aligns exactly with the first beat. If the tempo has slipped, then adjust the tempo of the previous measure so that the kick drum remains aligned.
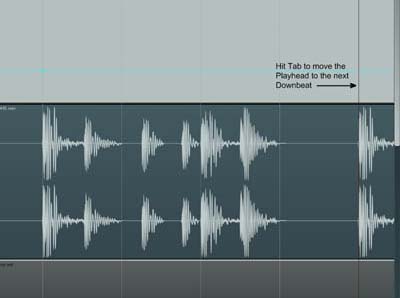
In Reaper, one can use the tab to transient function if there is a sound present on the downbeat. Select the track that has this sound (usually the Kick or CYM track, and hit tab until you reach the start of the measure (Figure 5).
|
| Figure 5: Using the Tab key to move to the play-head to the next measure. |
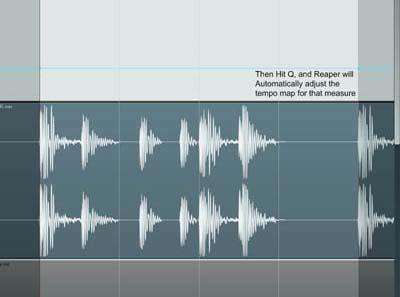
Then hit Q to run the Custom Set tempo by bar function included in the RBN Keymap (Figure 6). Using this function at the start of each measure will ensure that the tempo map is very accurate.
|
| Figure 6: Using the Q key to tempo map a measure. |
Just keep tabbing over for each downbeat. You should have one tempo marker per measure when you're finished- a song can have subtle tempo variations that add up, and if you don't pay attention, you can wind up with notes feeling far too late or early.
Meter Changes
Handling songs with changing meters (also known as time signatures) is quite simple using custom actions in the RBN Keymap. Simply tab to the start of the 2nd bar of the new meter section, and hit T instead of Q to run the Custom Set tempo/change time signature by bar function. You will be prompted to enter a new time signature for the selected measure. This meter will now be the default for the Set Tempo by bar function. You can keep using the tab to transient function for these sections, just make sure to focus on the downbeats. To change the meter back, simply repeat the process when the meter changes again.
In cases where you are switching back and forth between different meters over short durations, you may need to force the meter change via the custom Reaper action "Markers: Create measure from time selection (detect tempo, new time signature)". You can use this action via the following steps:
- 1) Tab to the start of the measure after the time signature change, and hit T (as usual)
- 2) Go back and highlight the measure in which the time signature changes
- 3) Access the Actions menu from the top toolbar in Reaper
- 4) Select "Show Action List"
- 5) Search for "Markers: Create measure from time selection (detect tempo, new time signature)"
- 6) Run this action. The measure should now have the correct time signature.
If you find yourself using this action a lot (I.e. if your song has multiple time signature changes), it is best to map it to a custom key-map for quicker use.
Also, remember that when changing meters, you should adjust your BEAT track (see below) as well. Many animations won't be harmed if you forget, but things like the vocalist percussion animations, and certain directed cuts that fall on downbeats won't look right, plus the crowd may clap out of time.
Tempo Mapping By Hand
If the Custom actions mentioned above won't work for you song (if it has no drums, or no drum hits or other discernable transients on the downbeat), or if you want to make micro adjustments to your tempo map, you can add additional tempo markers at any point and adjust them by hand. To do this hold shift and click on the tempo envelope to add a tempo marker (Figure 7):

|
| Figure 7: Using Shift-Click in the Master Track to add a tempo marker. |
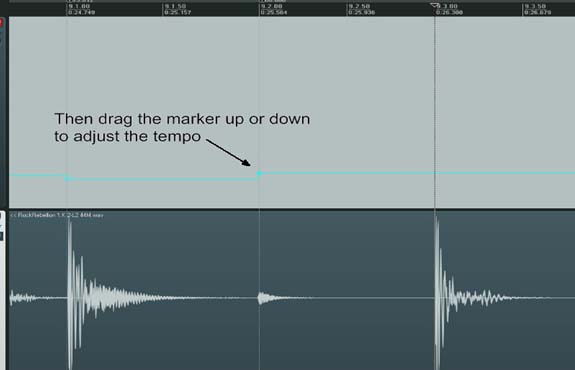
And then drag that marker up or down to adjust the tempo (Figure 8):
|
| Figure 8: Drag marker up or down to adjust the beat. |
We recommend having ABSOLUTELY no more than 1 tempo marker per beat. Any more than that is completely unnecessary. Even if you're trying to match the tempo of every note of a sloppy guitar part, any more than 1 tempo change per beat is wasted work on your part.
Continue mapping the correct tempo for the rest of the song. An inaccurate tempo map will directly affect how well a song plays, so it’s important to do this first, and to be as accurate as possible. Changing a tempo map on an already authored song can introduce lots of problems and inaccuracies, so it’s important to get your Tempo Map as accurate as possible before authoring begins.
Adding or Removing Time After Tempo Has Been Mapped
If you end up needing to add or remove time from the beginning of (or elsewhere in) your song without affecting all the mapping/authoring you've done after that point (a common reason is you accidentally didn't leave enough time for a drum count-in), the answer lies in two very handy custom Reaper actions.
Adding Time
- Select how much time you want to add by moving your playhead to where you want the additional time to begin, holding shift, and clicking on however much space you want to add.
- Run the "Time Selection: Insert space at time selection (moving later items)" action from the Action list. That will add blank space and shift everything (MIDI items, tempo markers, etc) later.
Removing Time
- As you might have guessed, follow the same steps above, but use the "Time Selection: Remove contents of time selection (moving later items)" action instead.
EVENTS Track
The EVENTS track contains only text events and no MIDI notes. These text events affect the main functioning of the game, the crowd audio in the game and how the onscreen crowd animates. Along with the tempo map, it forms the backbone of the structure of the song in the MIDI file.
The [end] is the most important text event in any song. The [end] event is when sound playback stops, the tracks are removed from the screen, and scores are tabulated. To avoid pops or clicks in the audio, it’s important to place the [end] event after all audio stems have faded down to zero. Sometimes in order to avoid unnecessary waiting at the end of a song, we will fade out the last note of a part a little early (bass parts usually ring out the longest, so they are most often faded short). The [end] text event must also be the last MIDI item in the song's MIDI file. There can be no MIDI notes or text events that occur after the [end] event. There's an [end] event located at measure 120 of the RBN Template file. You should drag it to the appropriate spot for the end of your song. Because the [end] event must be the last MIDI item in a song, make sure that the last note in the BEAT track occurs 1 beat before the [end] text event.
The [music_start] and [music_end] text events control the background crowd audio in the game. The [music_start] event transitions the crowd audio from its "intro" state (the crowd milling around in the club getting ready for the show to start) to its "play" state (the crowd reacts to how you're performing the song, cheering if you're doing well, booing if you're not). The [music_start] event also triggers a sound effect of a big cheer. The [music_start] event already exists on the EVENTS track of the RBN Template. You should move it to the place in your song where the crowd would recognize the song and get excited (usually when a main riff starts or when the whole band comes in) The [music_end] text events transitions the crowd audio from its "play" state to its "outro" state (the crowd being super-psyched that you just gave an awesome performance). The [music_end] event also triggers a big cheer sound effect, so you should place this text event right after the last note of a song, or when a crowd would start cheering at the end of the song. The [music_end] event already exists on the EVENTS track of the RBN Template, so you should just move that event to where it's appropriate for your song.
Finally, the [coda] event marks the beginning of a Big Rock Ending and when the scoring system changes. This is only used in conjunction with the BRE lanes in the instrument tracks at the end of a song.
The EVENTS track can also be used for special timekeeping notes during Practice Mode. The following MIDI notes in EVENTS will play sounds in Practice Mode alongside the isolated stem when slowed below 100% speed:
- D0 (26): Hi-hat sample
- C#0 (25): Snare sample
- C0 (24): Kick drum sample
See this example. This feature should only be used if your song has stems.
Crowd Animations
The intensity of the crowd is controlled by text events (only text events, no notes) in the EVENTS track. The available events are a lot like the player animation events:
| Text Event | Animation |
|---|---|
| [crowd_realtime] | The crowd uses its non-beat-based animations. Default for the beginning of the song. |
| [crowd_intense] | Allows for maximum intensity. The crowd will go nuts and jump around if you’re doing well. |
| [crowd_normal] | The crowd will put their hands up and sway, but will never get super-crazy. |
| [crowd_mellow] | The crowd will stay pretty mellow, swaying to the beat of the song. |
| Text Event | Clapping Sound Effect |
|---|---|
| [crowd_clap] | This is the default state. A clapping sound effect will play along with the rhythm of the song when you’re doing super well. |
| [crowd_noclap] | This turns off the clapping sound effect, regardless of how you’re doing. It’s a good idea to insert this event when the rhythm of a song breaks down, or during a quiet section of a song when a crowd wouldn’t clap along with a song. |
You must place one of these text events (usually [crowd_intense] near the beginning of your song, where you want the crowd to start jumping up and down. Through the body of the song, the crowd will react based on your band meter. If you're doing well, they'll go nuts, not so well and they'll mellow out (the crowd has 3 intensities of animation: mellow, normal, and intense). If you want more control over the maximum intensity of the crowd, you can insert additional text events into the EVENTS track ([crowd_mellow], [crowd_normal], or [crowd_intense]) The crowd will still react based on your band meter, but their maximum intensity will not rise above the state in the text event.
It's a good idea to insert a [crowd_mellow] text event during a quiet part of a song, as it would look unnatural for a crowd to be going nuts at that point in an actual concert. Additionally, you can use text events to make certain parts of the song seem extra-intense by raising the maximum intensity of the crowd. For example, you can place a [crowd_normal] text event at the start of a song's pre-chorus, and a [crowd_intense] text event at the start of the chorus. This will make the crowd get more intense for the chorus which will, in turn, make the chorus feel extra awesome for the player.
Remember that these crowd text events will stay in effect until another text event is placed on the track. So if you place a [crowd_mellow] text event on the track, the crowd will stay mellow until another crowd text event (such as [crowd_intense]) occurrs.
The crowd will normally clap along with the song (at the same tempo as the notes on the BEAT track) when your band meter is completely full. If you need to turn the clapping sound off, place a [crowd_noclap] text event on the EVENTS track. If you want the crowd to start clapping again, place a [crowd_clap] text event on the EVENTS track. The [crowd_noclap] text event is also almost universally used just before the last note of a song in order to prevent the crowd from clapping in rhythm after the last note of a song is played. If you don't use this event, the crowd will continue to clap along with the notes on the BEAT track until the [end] event, which usually sounds odd.
VENUE Track
The VENUE Track controls the camera and lighting system for Rock Band. If you leave the VENUE Track blank, the MAGMA tool will generate a series of camera cuts and lighting changes for you. For best results you should add Practice Sections to the EVENTS track for Autogeneration to work really well.
But if you want your song to really stand out, you can direct your own VENUE track. Please check out the RBN2_Camera_And_Lights document for more info on how to customize cameras and lights for your song.
BEAT Track
The BEAT track contains only MIDI notes, and drives the animations for the characters, lighting, and the crowd. The BEAT track also dictates how quickly Overdrive depletes once it's deployed. The RBN Template file has a premade 120 measure long BEAT track in 4/4, but it’s very easy to change it if your song is in a different meter, or if you want the characters to animate in half-time or double time (which you should do if you song is particularly fast or slow)
BEAT Track Notes:
| MIDI Note | Beat |
|---|---|
| C -1 (12) | Downbeat (beat 1) |
| C# -1 (13) | All other beats |
For example, in a 4/4 song, for each measure, there is a C-1 note, followed by 3 C#-1 notes. In a 3/4 song, there would be a C-1 note followed by 2 C#1 notes.
The last note in the beat track needs to occur one beat before the [end] event in the EVENTS track. If your song is less than 120 measures, and you move the [end] event in the RBN Template file, be sure to delete all notes in the beat track that occur after the [end] event. If your song is longer than 120 meausres. You'll have to add notes to the BEAT track to be sure that the characters keep animating until the [end] event occurs. Remember that the last note in the BEAT track should occur 1 beat before the [end] event.
Congrats! Your MIDI file is all set up! If you're authoring a song with multiple people, it's now safe for others to start working on the instrument parts. If you're flying solo, continue on to the individual instrument docs to learn more about how to make really fun and accurate instrument charts for your Rock Band Network song.