Magma
From RBN/C3 Documentation
"Where does rock come from?"
Magma is a PC tool that allows authors to build Rock Band Network song packages ( *.rba ) using multi-track audio files and MIDI gameplay files. Magma is essentially the packaging and distribution tool for the Rock Band Network, and it is the PC counterpart to Rock Band 3's in-game Audition Mode.
- C3 note: To use additional features that the RBN don't support but that customs do, be sure to use C3 Magma.
Contents
Prerequisites
To use Magma, you'll need to have finished (or mostly finished) the Authoring process. Magma runs a very thorough check of your stems and MIDI file, and while its error messages are a great way to identify problems, nothing beats getting it right the first time.
Your MIDI file needs to meet many requirements, which are outlined in Authoring. If you are working with an incomplete MIDI file, you may need to adjust or add several elements to make it work with Magma.
Your audio files (stems) also need to meet several requirements:
- .wav file format
- 44.1Khz or 48Khz sample rate (except for dry vocals files)
- Mono or stereo will work, but see the Audio Tab section below for some caveats
- 16- or 24-bit bitrate
Finally, all text and metadata entered into Magma itself can contain only the following characters:
- ABCDEFGHIJKLMNOPQRSTUVWXYZ
- abcdefghijklmnopqrstuvwxyz
- #$%&'()*+,-./
- 0123456789
- :¿ÀÁÂÃÄÅÆÇÈÉÊËÌÍÎÏÐÑÒÓÔÕØÙÚÛÜÝÞßàáâãäåæçèéêëìíîïðñòóôõøùúûü
- !¡©®°
Basics
Magma is simply a tool to combine your audio files, MIDI (gameplay) file, and song metadata together to make a complete Rock Band song package. (This process is called building a song package.) These three elements are represented by three tabs, each of which is covered in its own section below.
Projects and Build Location
Each song you create in Magma will have its own Magma Project file (.rbproj). Before you can build a song, you'll need to have saved your current project to an .rbproj file and assigned a "Build To" location for the song package file. To save a project, simply use "Save As..." from the File menu, like any other Windows program. To assign a build location, look for the "..." button in the lower left of the Magma window.
Build & Audition
At the bottom of every tab are controls for building and auditioning your song (Figure 1). Clicking any "Build" button will automatically save your project and start the song package creation process. If only a few elements have changed since your last build, Magma will try and build only those elements; if you've only changed your MIDI, for example, Magma will not re-compile the audio.

|
| Figure 1: Magma (RBN) controls. |
Build and Audition: Build the song with current data and immediately open the "Transfer to Xbox" window. (See "Transfer" below for more information on transferring songs to your Xbox 360.)
Build: Build the song with current data.
Audition: Opens the "Transfer to Xbox" window.
Information Tab
|
| Figure 2: Magma (RBN) Information tab. |
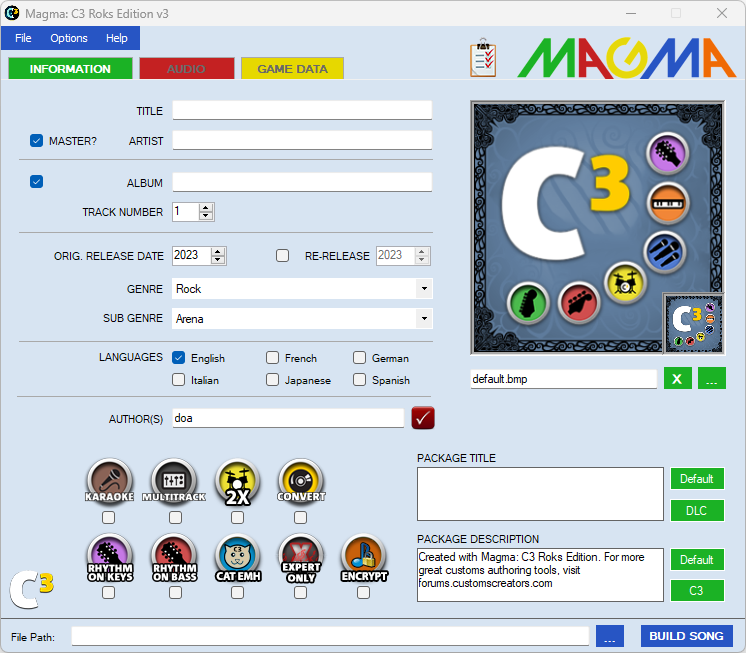
The Information tab (Figure 2) is where you will populate most of your song's metadata. Keep in mind that you can't fix any mistakes you make in this tab once your song is published!
- Title: The name of your song, e.g. "Roxanne". Max length 99 characters.
- Artist: The artist or group performing the song, e.g. "The Police". Max length 74 characters.
- Album: The album on which your track originally appeared, e.g. "Outlandos d'Amour". Max length 74 characters.
- Track Number: The track number of this song (1-100) on the album from the "Album" field. If three or more songs from this album exist in Rock Band, the game will create an album header and sort the songs by track number.
- If your song does not appear on an album, leave the checkbox next to these fields blank.
- Year Released: The year this song was first released.
- Genre: The genre of music that most closely matches the song. This is a very subjective measure, but do your best to compare it to other songs already in the Rock Band library for consistency.
- Sub Genre: A more specific genre within your selected genre. This data is not currently used outside of the Music Store, but should be as accurate as possible. Check the Subgenre Descriptions page for more information.
- Country of Origin: Where the track was recorded, or where the band is from.
- Languages: Check each language that is sung or spoken in the vocal track. Each song must be reviewed in every language checked, and if there are languages in the lyrics that are not set here the song will fail Peer Review. Currently, these are the only lyric languages that we support.
- In some cases, if the additional language(s) make up a trivial part of the song (such as a single word or commonly known phrase like me gusta), you may not need to check the appropriate box here. Use discretion.
- Author: The creators.rockband.com login of the user or company creating this song. This entry must be a valid login name linked to an active non-trial App Hub subscription.
- Price: The recommended price, in Microsoft Points, that will be charged for this song. 80 MSP = USD$1.00.
- Release Label: Only used for RBN songs (not customs).
- The song's album art, the large image on the right side of this tab, can be selected by browsing to an image with the nearby "..." button. All art will end up as a 256x256 pixel 24 bit .bmp file, and will be converted by Magma if it does not meet these restrictions. Be aware that this can reduce the quality of your image, and you should review it once imported to make sure it's still satisfactory.
Audio Tab
|
| Figure 3: Magma Information tab. |
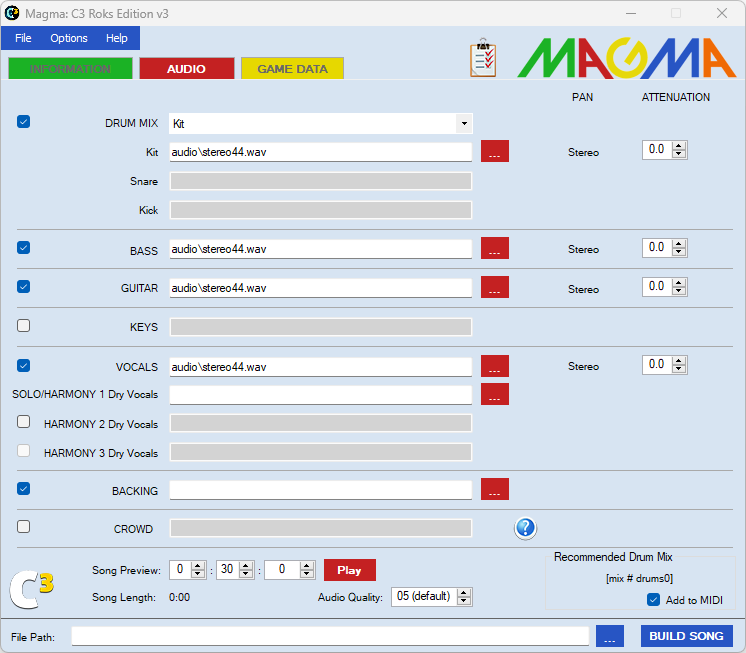
This tab (Figure 3) is where you'll take your fully authored audio stems and mold them into a single piece of rock, or Urban Jazz, or Country Shoegazing Outlaw A-capella, or...well, you get the idea.
Check the box for each part that is present in the song and authored in your MIDI file, and browse for the appropriate .wav from your system using the "..." buttons. Note: If you haven't finished a particular track and want to test the song in Audition Mode without it, you can leave that part unchecked to skip it in the build phase. This won't impact your ability to build that part later.
C3 note: For customs that doesn't use multitracks or separate stems for each instrument, put a synced WAV of your song in the Backing/TRKS track, then right click all other parts that you have charts for and select one of the built in silent audio files that comes with C3 Magma instead. We do this so the song plays as normal in game without odd or speaker damaging audio drops and rises.
Drum Mix: Check this box if you have a drum track. The drop down allows you to select which drum parts you want to include. At a minimum you will need a "Kit" track (one stem for the entire drum track), but "Kick" and "Snare" parts can be added for more audio fidelity. For more information about this, please read Drum Authoring.
- Kit: The .wav file for your catch-all drum kit part. This may contain the entire drum kit audio, but if you have snare and kick recordings, this track usually contains the overhead recordings of the rest of the kit. Sometimes referred to as CYM (for "cymbals").
- Snare: The .wav file for your snare drum, if present. Sometimes referred to as SN.
- Kick: The .wav file for your kick/bass drum, if present. Sometimes referred to as K.
Bass: Check this box if you have a bass guitar part.
Guitar: Check this box if you have a lead guitar part.
Keys : Check this box if you have a synth, keyboard, or other track to be played in Keys and Pro Keys. Checking this box requires full authoring for Keys and Pro Keys to build correctly.
Vocals: Check this box if your song has vocals. This file should be the finished mixdown of your lead vocals and harmony vocals (if applicable) together. Sometimes referred to as VOX.
SOLO/HARMONY 1 Dry Vocals: This is a .wav file of your lead vocal part with no effects ("dry"). This file is not included in your final song package, but is required by Magma's lip-sync engine to accurately render character animations. This file should NOT include any background vocals.
- If you have a vocal part, this field is required. If no other dry vocals boxes are checked, only the Solo Vocals option will be available in-game (no harmonies).
HARMONY 2 Dry Vocals: The dry vocals .wav file for HARM2. If this box is checked, the game will assume that you have at least 2 vocals parts, requiring authoring in PART VOCALS, HARM1, and HARM2. This file should include ONLY background vocals.
HARMONY 3 Dry Vocals: The dry vocals .wav file for HARM3. This cannot be enabled without HARMONY 2 enabled. If your HARM3 part is the same as HARM2 but on different pitches, this file can be the same as your HARM2 file, but should be different if your song has any call-and-response parts or similar.
Backing: This audio track includes any band audio that's not in the bass, drum, guitar, keys, and vocals files. Sometimes referred to as TRKS.
Crowd: Use this if you are using multitracks that has it's own stem for the sound of the crowd, mostly found in certain live recordings.
Start Preview: This allows you to set the beginning of the audio preview window for your song. These previews are heard in the in-game songlist, in the Music Store, and on rockband.com, so pick a good window! Song previews are always 30 seconds long. Use the Song Length preview next to this box to ensure that your preview doesn't run over the end of the song. Song length is determined by the longest .wav file included in the song (except the dry vocals track).
Audio Quality: Use this to change the quality of the audio tracks being encoded when building the song. Magma C3's default setting is 5.
- If audio quality is greater than 3, they will not load properly on the Wii and PlayStation 3 versions of Rock Band 3.
- If Wii Mode is enabled in "File -> Import", the maximum setting is 3.
Recommended Drum Mix: When setting a drum mix in your audio tracks, this window indicates what to set in the PART DRUMS track in your authored MIDI file.
- If clicked on, it will copy a text event that you can paste in Reaper's MIDI editor when authoring your PART DRUMS track.
- If "Add to MIDI" is checked, text events will be added or changed automatically while building your song.
Pan
If you use a mono audio file instead of stereo, you'll have the option to adjust the L/R pan. (We assume that you've already correctly mixed your stereo files' pans.) Values range from -1 (all left) to 1 (all right). Use this for final tweaks to your mix.
Attenuation
These fields let you adjust the levels of each part from within Magma, in case your mixing ends up too loud in-game. (Think of your neighbors!) If your stems are too soft, you'll need to adjust that from within your DAW. Currently this bad boy ranges from 0 to -10, in db from Unity gain. Use this for final tweaks to your mix.
Game Data Tab
|
| Figure 4: Magma Game Data tab. |
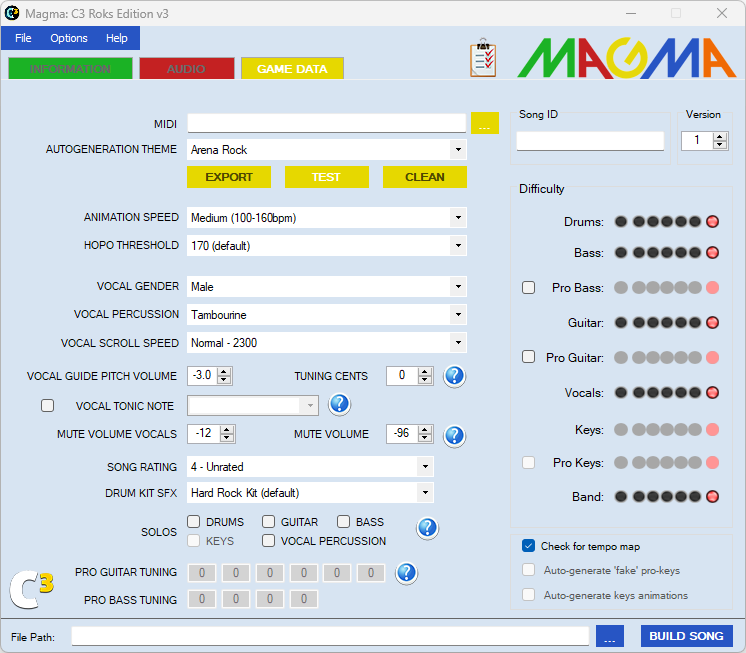
In this tab (Figure 4), you'll define all of the things that make your song work in Rock Band 3.
MIDI: This is the path to the gameplay MIDI file you authored.
Autogeneration Theme: If you have not placed any camera or lighting cues in your VENUE track, Magma will automatically create them for you. This field lets you control this auto-generation based on a theme included with Magma or that you've created yourself.
Export: This button will export the autogenerated VENUE track to a new MIDI file. You can use this to save the autogenerated camera and lighting cues and edit them as you like.
- For more information on venue autogeneration and how to create your own themes, check out Venue Autogeneration.
Animation: This setting controls the speed of characters' animations on-stage. This defaults to medium tempo, but should be adjusted based on the BPM of your song.
Vocal Percussion: This determines what sample gets played when your singer gets their percussion on.
Vocal Gender: If a random singer is selected for this song, this determines the gender of that character. This should be the gender of whomever sings your PART VOCALS / HARM1 track.
Vocal Scroll Speed: This controls the scroll speed of the lyrics, and should usually be set to "Normal". If you find that the vocals HUD gets crowded by your song's lyrics, you can set this to "Fast".
Vocal Guide Pitch Volume: This value, which ranges from -10.0 to 0.0, determines the volume of the guide pitch that plays in Audition Mode and Training. The default value of -3.0 will work for most songs, but you should adjust it if you have a particularly loud or soft vocals part.
Difficulty: Rock Band uses a tiered system to identify a song's difficulty in both the Music Store and the in-game song list. Each of these dots corresponds to a difficulty category in the song list: Warmup, Apprentice, Solid, Moderate, Challenging, and Nightmare. To assign the Impossible tier, click on the devil head icon to the right of the dots. The band difficulty rating should usually be an average of the other parts.
Song Rating: Shows the age rating of your song in-game and in Vizualiser. Family Friendly means the song should be okay for the whole family to play, Supervision Recommended means the lyrics or themes contain content that kids below their teenages should probably not be exposed to yet, and Mature means the song contain strong explicit content like hardcore swearing, hardcore violence or hardcore sex.
Pro Guitar/Bass Tuning: Changes the tuning of the song for Pro Guitar and Pro Bass in-game. For more information on how this work and what it's used for, click the help button in Magma C3 for a detailed explanation.
Drum Kit SFX: The drum kit sfx determines the sounds your annoying drummer friend makes before the drum track starts and during drum fills. When experimenting with this, be sure to check out the different sounds in-game to make sure you pick a sound that fits with the song.
For more information on the additional advanced features in C3 Magma, such as Tuning Cents and Vocal Tonic Note, click the help buttons in the program for detailed explanations and guides.
Transfer
To transfer a song from Magma to your Xbox 360, open "Magma - Audition" from the Start Menu or click "Audition" from within Magma's main window. Selecting "Build and Audition" will also open the transfer window following a successful build.
|
|
| Figure 5: Magma (RBN) controls. |
Prerequisites
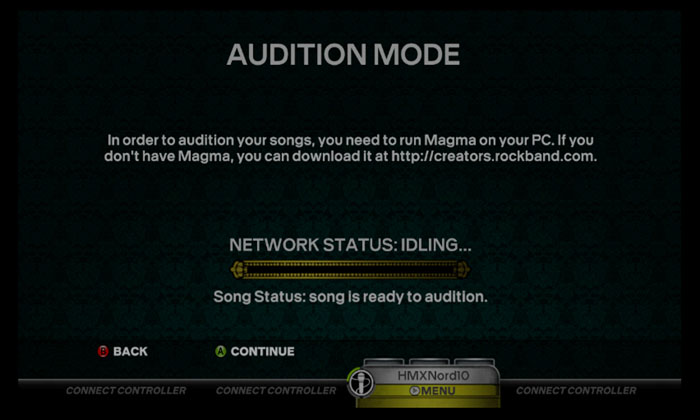
Before you can transfer a song, you need to open Audition Mode from within Rock Band 3 using a Gamertag with a valid non-trial App Hub membership. To do this, press START to open the menu, and then select Options -> Extras -> Audition Mode. The screen below should appear (Figure 6).
|
| Figure 6: Rock Band 3 Audition Mode. |
This means that Rock Band is ready to receive a song file from your PC!
You will also need a valid .rba or .rbs file to send to Audition Mode. If you reached Transfer from Magma's "Audition" or "Build and Audition" buttons, your .rba file should already be populated. If you're playtesting or Peer Reviewing a song from the Creators community, you will need to have the .rbs file you downloaded on hand.
Transfer
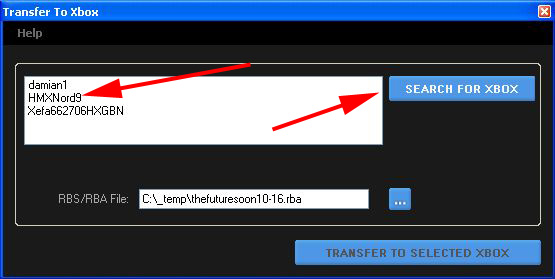
Click on "Search for Xbox". After a few seconds, you should see the Profile Name from your Audition-Mode-ready Xbox in the list of available 360s. Click on your profile to highlight it (Figure 7).
|
| Figure 7: Magma Transfer to Xbox (Step 1). |
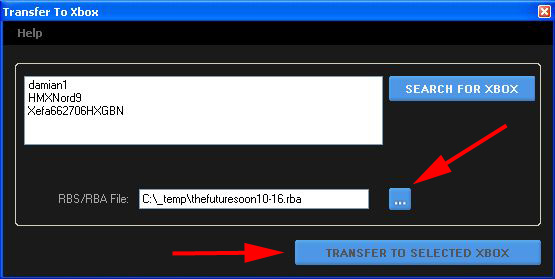
Next, if you don't have an .rba or .rbs file in the edit box, click "..." to find the file you wish to transfer. With an Xbox and song package selected, click "Transfer to Selected Xbox" to begin the transfer process (Figure 8).
|
| Figure 8: Magma Transfer to Xbox (Step 2). |
View the Audition Mode page to learn how to use Audition Mode after a successful transfer.
Troubleshooting
Check out the Tools FAQ to solve a number of Magma issues related to installation and transfer.
Magma Compilation Errors lists several common build errors and their solutions.