Pro Keyboard Authoring
From RBN/C3 Documentation
Contents
The General Philosophy
Starting with Expert, authoring should be, both rhythmically and harmonically, an exact transcription of the right hand part of the keyboard performance. From there, we use a combination of lane shifting, melodic wrapping, and voicing adjustment to fit the part within the restraints of the game.
Lane shifts
Since Pro Keys authoring is basically an exact transcription, the authoring aspect of it is fairly straight forward. What makes it so challenging are lane shifts. The Pro Keys track on screen only shows a 10th at a time (e.g., C2-E3), and most songs do not fit in such a small range. Because of this limitation, we use lane shifts to move between different ranges within a song.
Lane shift markers control what range is displayed:
| MIDI Note | Note Range |
|---|---|
| MIDI note 0 | ("C2-E3 Range" in the template) shifts to display C2-E3. |
| MIDI note 2 | Shifts to display D2-F3. |
| MIDI note 4 | Shifts to display E2-G3. |
| MIDI note 5 | ("F2-A3 Range") shifts to display F2-A3. |
| MIDI note 7 | Shifts to display G2-B3. |
| MIDI note 9 | ("A2-C4 Range") shifts to display A2-C4. |
Try to primarily use the ranges of C-2 (C2-E3 range), F-2 (F2-A3 range), and A-2 (A2-C4 range), because they are the easiest ranges to read in game.
If lane shifts can be avoided altogether, or a certain section fits better within a different range (E-2, E2-G3 range is the most common), that is acceptable.
Black notes can NEVER be used for lane shifts. We only place lane shift markers on white notes.
In order to start the song in the correct keyboard range, each difficulty MUST have one range marker (lane shift) at the beginning of the song before the keys come in.
Start by transcribing the entire track, then go back through the song and enter lane shifts where necessary.
The lane shift occurs in-game where you place the lane shift note. However, you need to actually shift the track approximately one bar earlier than the first note that's out of range.
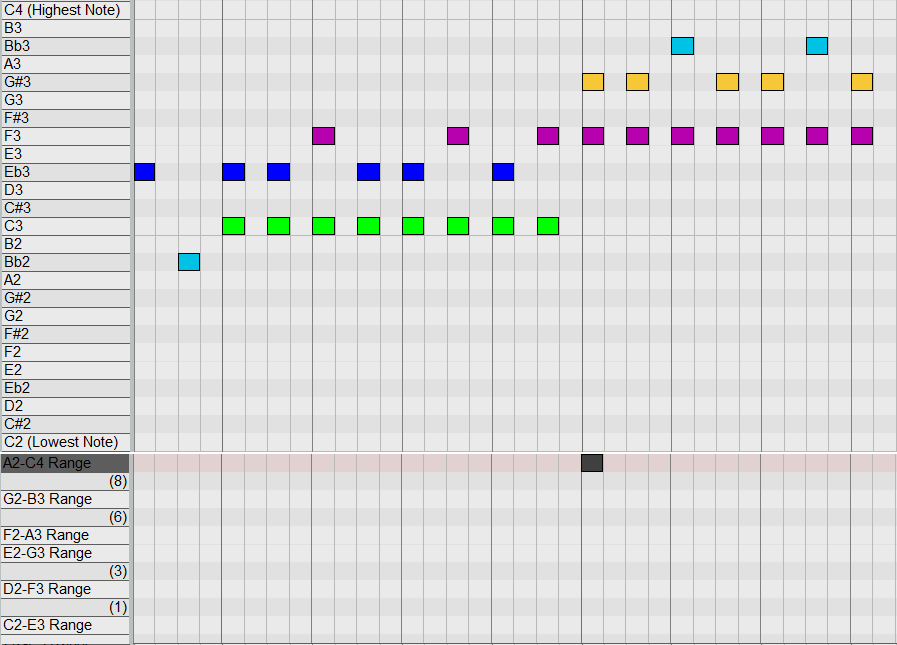
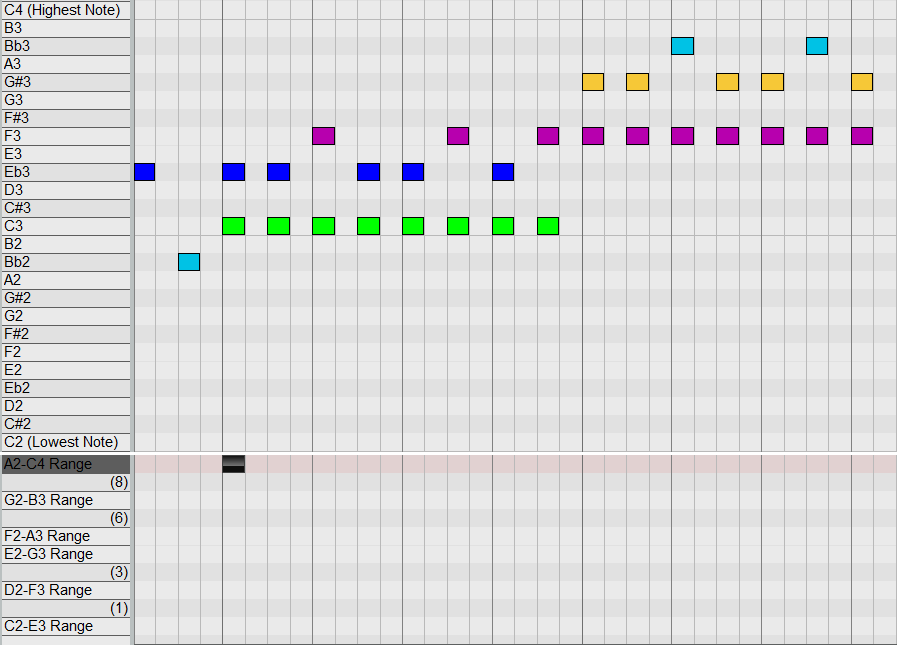
Lane shifts need to occur approximately one bar before the first note that is out of range of the current range (depending on the tempo of the song). Notes that are out of range will appear off the side of the track. Because of this, we try to add lane shift markers as early as possible, in a part of the song where there are notes shared by both the current range and the range you’re shifting to (Figures 1 and 2).
|
| Figure 1: Incorrect range shift. |
|
| Figure 2: Correct range shift. |
Because range shifts make gameplay more difficult, we try to keep them to a minimum. This means that you should avoid shifting for single notes or chords. Try not to shift unless there is at least a bar or more before shifting back.
Often lane shifts occur on repeated notes, or sustained notes since this is easier to parse, rather than placing them on a new section.
There are going to be cases when octaves, voicings, and melodic lines will need to be fudged. It is often better to shift a higher set of notes or chords down an octave to fit within the current range, or to change a chord voicing if the top note or two of a chord is out of range.
If you do run into a scenario where you need to move notes into a different octave, make sure the placement still feels natural to play. If you find yourself with a giant jump up or down, you might need to remove the note entirely.
Notes should never be displayed outside the current range. Your lane shift needs to be completed in time to avoid notes showing up outside the current range.
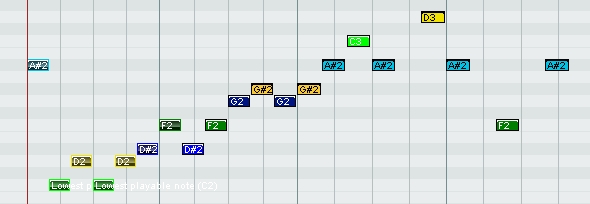
Wrapping
Sometimes, because of range constraints, long melodic lines will often need to be wrapped, similar to the way we wrap notes for the 5-button guitar/bass. When doing this, be sure to wrap in a spot that makes both rhythmic and melodic sense and be sure to observe the interval jumping rules as the apply to different difficulties (Figures 3 and 4).

|
| Figure 3: Unwrapped melodic line. |
|
| Figure 4: Wrapped melodic line. |
Overlapping Gems
In both Pro and 5-lane keyboards, we are allowed to use overlapping gems to represent broken chords.
Generally, there should be no more than four overlapping notes at a time. If there are more than four notes in a broken chord, the first note will need to end before another note can be added.
Overlapping notes should not span more than an octave. If a broken chord spans more than an octave, the first note will need to end before a note outside the octave range can be added.
Overlapping gems are allowed as follows:
- Up to 4 notes in Pro Keys Expert / Hard & 3 notes in 5 lane Expert / Hard
- Generally no overlapping notes are allowed in Medium. In some rare cases we will add 2 note overlaps if they are spaced out over a ¼ note or more.
- Not allowed in Pro Keys Easy or 5 Lane Easy

|
| Figure 5: Overlapping Gems. |
Expert Pro Keys
The Expert Pro Keys part should be authored between C2 (48) and C4 (72) on the PART REAL_KEYS_X track.
Expert Pro Keys (PK) should be an exact melodic, harmonic, and rhythmic transcription of the Right Hand (RH) keyboard part of a song. If there are sections in which the Left Hand (LH) part can be added, then that is allowed, but the part must be playable with only one hand.
Expert PK can contain up to 4-note chords, within the span of an octave (12 semitones).
Sustained notes need to leave space before the next note(s) to give the player time to move their hand into position. For most simple transitions, like a single note to another single note or a single note into a chord that uses that note, leave a 1/16th note space. When transitioning between two chords or between a chord and a non-complementary note, leave an 1/8th note space.
Lane shifts are allowed in Expert PK, but not required; if a lane shift would be used for just one or two notes in the middle of a larger pattern, it may make more sense to "fudge" those notes into the visible lanes rather than use a very short lane shift.
Hard Pro Keys
The Hard Pro Keys part should be authored between C2 (48) and C4 (72) on the PART REAL_KEYS_H track.
Hard Pro Keys should be a reasonable version of the Expert part. Start by removing extraneous 16th notes, grace notes, and any left-hand part that may have been included on Expert.
Hard PK should only contain 2- and 3-note chords, within the span of a 7th (11 semitones).
Try to avoid interval jumps larger than a 7th between subsequent notes. If a jump that large is unavoidable, leave twice as much space between the two notes (i.e. pull back sustains or further reduce the part).
Make sure you remove any text events and solo/glissando/trill markers when you copy down the notes from Expert. Only Expert should have this data.
Sustain lengths should be the same as Expert, except where reduced due to interval jumps.
Lane shifts are allowed on Hard PK, but make sure to remove lane shifts that are no longer needed after reducing from Expert (except the initial "which lanes should this song use?" note).
Medium Pro Keys
The Medium Pro Keys part should be authored between C2 (48) and C4 (72) on the PART REAL_KEYS_M track.
Medium PK should be reduced to the basic rhythmic core of the song. There should be a space of a 1/4th note between each playable gem.
All sustains should be pulled back to leave a 1/4th note space before the next note(s). If this would make a sustain particularly short (shorter than 3/16ths in duration, for most BPMs), it may need to be pulled back into a 1/16th note to prevent awkward "stubby" sustains in-game.
Medium PK should only contain 2-note chords, and only within the span of a 6th (9 semitones). If it's impossible to reduce chords to this spacing due to awkward chord voicing or a string of difficult chord changes, reduce them to whichever single note is most prominent.
Try to avoid any interval jump larger than a 6th. If a jump that large is unavoidable, leave extra space for the player to move their hand. (Like Hard, this may require pulling back sustains or further reducing the playable part.)
Lane shifts are not allowed on Medium PK. Harmonic voicings will need to be shifted to fit within the visible 10th (16 semitones) of your choosing.
Easy Pro Keys
The Easy Pro Keys part should be authored between C2 (48) and C4 (72) on the PART REAL_KEYS_E track.
Easy Pro Keys should have roughly a half note worth of space between playable notes.
Sustains in Easy Pro Keys, however, should be the same as Medium Pro Keys, barring any necessary reductions (see below).
No chords are allowed on Easy Pro Keys. Reduce all chords to the most prominent and musically sensible single note.
Try to avoid any interval jumps larger than a 5th (7 semitones). If a jump that large is unavoidable, leave extra space between notes for the player to move their hand. Like Medium and Hard, this may require pulling back sustains; if you do this, remember to remove any "stubby" sustains.
Lane shifts are not allowed on Easy PK, and the visible range should match that of Medium.
Solo Sections
MIDI note G7 (115) marks solo sections.
The solo marker must start at the same time as the first note (note on) of the solo, and end at the same time as the last note of the solo (note off)
Keys solos should be dictated by the music, which can be a gray area. Try to avoid putting solo markers on little fills and repeated lead lines, and use it only when there is an obvious solo.
If a song ends with a solo make sure to end the solo marker as early as possible. This leaves time for the solo score marker to pop up before the track pulls out at the end of the song.
Glissando lanes
Glissando markers are placed on F#8 (126), on Expert difficulty only.
Glissando lanes should be placed over glissandos in a song that are reasonable to play. We try to only use them for glissandos that are a quarter note in length or longer.
Glissandos need to be authored in the PK part. The notes within a glissando should be white notes and evenly spaced between the beginning and end of the glissando. This is not always melodically accurate, but it looks cleaner.
Glissandos work by turning off the scoring system for any notes below a glissando marker. This means, that all the player really has to do is hit any notes within the marker to be scored for it.
Glissando markers are not usually placed over the first note of a glissando. We do this to encourage the player to actually attempt to play the glissando, instead of just mashing keys for free points.
Trill Markers
MIDI note 127 (G8) marks trill sections.
Trills markers trigger free form lanes to appear on the track that allows the player to play a trill, between two notes, without playing the actual authored rhythm of the part. As long as the player is alternating between the two notes at 160ms or faster, they will be allowed to continue playing in the free form lanes. If they dip below 160ms, the free form lanes will disappear, and they will be forced to play to the rhythm at which the part is authored.
- The threshold of 160ms is a hard coded number, so edge cases can creep up, if the tempo of the song is too low or too fast, where using a trill marker may not feel as good as just playing the authored rhythm.
Notes should be authored according to the rhythm of the song, and trill lanes placed above them.
Remember that this can only be used for two note trills, three note trills or higher will break the game.
Keyboardist Animation
Keyboard animations should be placed on PART KEYS_ANIM_RH and PART KEYS_ANIM_LH respectively. They should be placed between C2-C4.
The majority of keyboard parts are RH only. In these cases the authoring from the Expert Pro Keys part can just be copied into the RH keyboard animation track. If there is a LH keyboard part, it can be authored in broad strokes, but make sure that it lines up to the rhythm of the song in a reasonable way.
The most challenging thing about authoring keyboard animations, is that the character only has 3 octaves to play with on the keyboard in game. This means that the center octave is shared by both the right and left hand (ie: C2-C3 in the RH animation shares the same octave as C3-C4 in the LH animations). If there is a LH part, you may need to cheat the RH higher and the LH lower in the range to avoid clipping.
An easy way of creating the animation tracks is to initially transcribe the entire keyboard parts for the song including LH. That way you will have all the parts you need for Expert authoring as well as animations.
Overdrive
Overdrive is placed on Pro Key tracks the same way you would place it for a guitar or drum track. For Keyboards, you must place Overdrive in the 5 lane and Expert Pro Keys tracks, and they need to match. See the Overdrive and Big Rock Endings document for more details.