5 Lane Keyboard Authoring
From RBN/C3 Documentation
Contents
Basics
5-lane keys should be authored in MIDI track: PART KEYS
The General Philosophy
Starting with Expert 5-Lane Keys, authoring should be, rhythmically, a literal transcription of the actual keyboard performance. From there, we adjust the notes to best fit the Rock Band keyboard, then simplify the parts for each difficulty. We recommend authoring Pro Keys first, because it can give a good idea of the melodic/harmonic structure of a song, and the correct rhythms. However, 5-Lane Keys authoring is very similar to 5-Lane Guitar/Bass authoring, so unless a keyboard part is incredibly simple, we suggest not copying Pro into 5-Lane, but instead to use it as a general guideline for the part.
Note Consistency
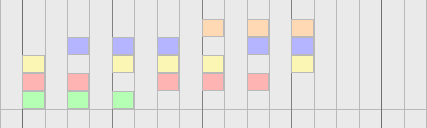
Consistency: When possible, keep the same gems representing the same notes (e.g. if you use a Red gem to represent an E note, continue to use red gems to represent the same E throughout the song), and with phrases that repeat throughout a song (e.g. the main riff in Everybody Wants to Rule the World).
Also, try to maintain consistency in chords throughout a song (e.g. if you use a Green/Yellow chord to represent an E chord, it should represent that chord throughout the song). This is often impossible as many songs have more than 5 notes and 7 basic chords (Figure 1), but try to stick to it as much as you can.
|
| Figure 1: Five notes and seven basic chords. |
Lane Consistency
Lane consistency: For each lane (color) that you use in Expert, you must use at least one gem of the same color in all the other difficulties. This is less challenging in 5-Lane Keys because the hand never shifts, therefore every color is permitted on every difficulty.
The only time this is truly challenging is if you are authoring a song with less than 5 chords. When we reduce to Easy, and chords are no longer allowed, all 5 colors must still be used. In these cases, refer to the technique suggested for 5-Lane Guitar/Bass lane consistency.
In the rare cases where you do not use all 5 colors in Expert, you must also be consistent and use the same reduced set of colors in the other difficulties. In other words, in Medium and Easy there should be at least one gem in each lane used in Expert level.
Preserve Motion
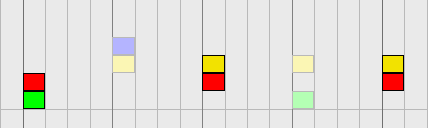
Preserve motion: Above all, keyboard authoring is about making the part feel right. Try to preserve melodic motion even if it means breaking consistency. For example, if our E note (previously mapped to a red gem) is part of a line that moves upward, it’s ok to map it to a different color in order to preserve the feeling of playing a higher note.
Also, make sure that the motion of your chords is correct (e.g. a Red/Blue chord is going to be higher in pitch than a Green/Yellow chord, but lower than a Yellow/Orange chord) see Figure 2.
|
| Figure 2: Chord motion. |
Wrapping
Often times, a melodic line will contain too many notes to fit within our five button constraints. This can also become more of a problem at simpler difficulties when you must use fewer gems. When this occurs, we wrap the gems, using patterns such as Orange/Blue/Yellow, Blue/Yellow/Red, Yellow/Red/Green (Figure 3).

|
| Figure 3: A pattern for wrapping gems. |
Author Intention Over Sloppiness
Much of rock and roll is sloppy by nature, however, our game is not. Therefore we need to "clean up" sloppy keyboard parts.
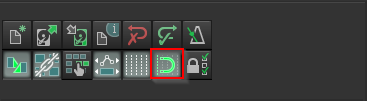
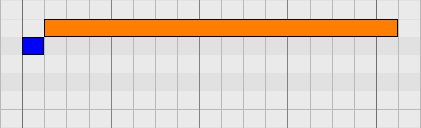
All authoring should be quantized, usually to 16th notes (in some cases 32nd notes or triplets). The easiest way to do this is to use the Snap to Grid feature in Reaper when entering notes (Figure 4).
|
| Figure 4: The snap-to-grid button in Reaper. |
If you can tell what the keyboardist intended to play, but they just didn’t quite make it, author the part as intended. There is a gray area here when it comes to solos, as they can be intentionally sloppy.
C3 note: "Intentionally sloppy" is a bit of a subjective topic, so charting chaotic solos on grid is still preferable for the sake of gameplay.
Chords
There are 6 basic types of chords for 5-Lane Keys. Each has its own feel.
| Chord | Gems |
|---|---|
| 1 3 chords | For example: Green/Yellow |
| 1 2 chords | For example: Green/Red |
| 1 4 chords | For example: Green/Blue |
| 1 5 chords | For example: Green/Orange |
| Three note 1 4 chords | For example: Green/Blue and Yellow |
| Three note 1 5 chords | For example: Green/Orange and Red |
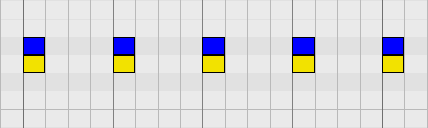
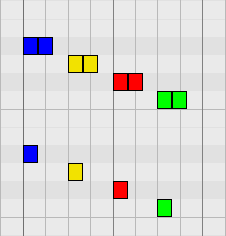
1 3 chords are your basic chord shapes (Figure 5).
|
| Figure 5: 1 3 chords |
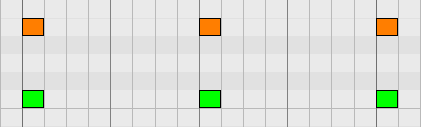
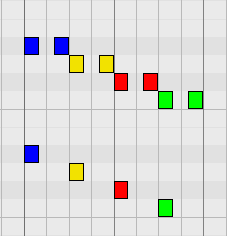
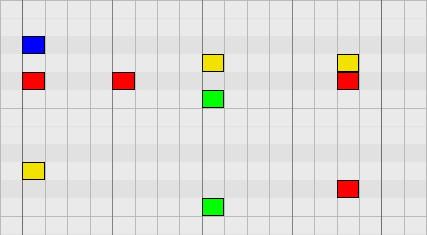
1 2 chords feel good for smaller chords sounding chords (Figure 6).

|
| Figure 6: 1 2 chords. |
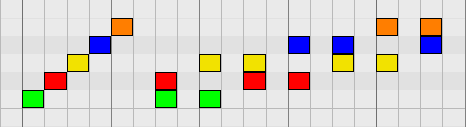
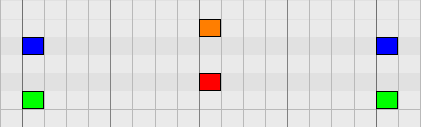
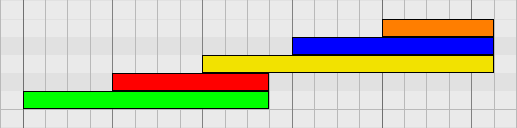
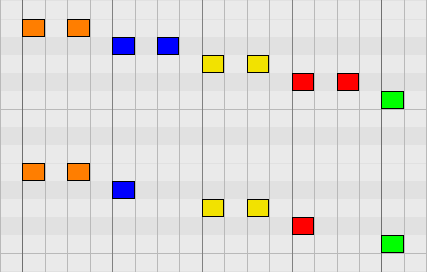
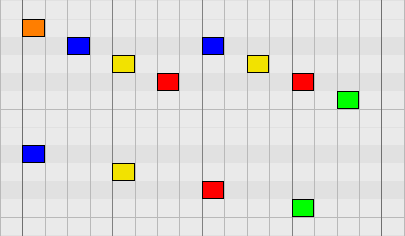
1 2 chords are most commonly used conveying motion in extended sequences of chords. To use an extreme example, if we have a descending pattern that is 7 chords long, we would use Blue/Orange, Yellow/Orange, Yellow/Blue, Red/Blue, Red/Yellow, Green/Yellow, Green/Red (Figure 7).
|
|
| Figure 7: 1 2 Chord motion |
1 4 chords are great for suspended chords, but can also be used as octaves (Figure 8).
|
| Figure 8: 1 4 chords. |
1 5 chords are also great for octaves (Figure 9).
|
| Figure 9: 1 5 chords. |
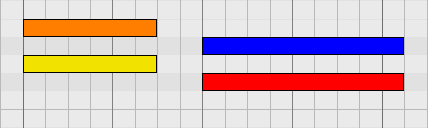
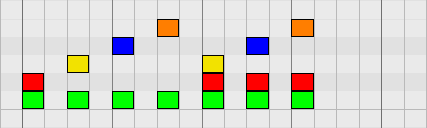
3 note chords are usually only used for nonstandard or "big" chords; like augmented, seventh, and diminished chords, or perhaps a normal chord with a tension added to it. For 5-lane keys, there are now two types of 3 note chords.
- a) The standard 3 note chords we use for keyboard authoring (Figure 10), and
|
| Figure 10: Standard three note chords |
- b) 3 note chords that include a center note between a set of Green and Orange gems. These chord shapes are used more frequently for “big” chords (Figure 11).
|
| Figure 11: Additional three note chords for keys. |
Keep in mind that with the addition of 3 note chords that are bracketed by Green and Orange gems, there can be a bit of motion consistency lost if these chords are used in conjunction with the general 3 note chords. Always be careful to make sure these chords feel good within the overall part when using them.
Overlaps and Sustains
In keyboard authoring, we are allowed to use overlapping gems to represent broken chords.
For 5 lane authoring, however, you should not overlap more than 3 notes at a time. If there is a sequence of overlapping notes, you may need to break up the overlaps (Figure 12).
|
| Figure 12: Only three overlapping notes. |
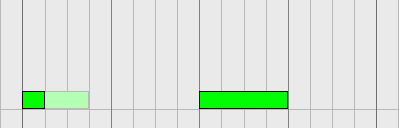
Sustained notes: There are some basic rules pertaining to the use of sustained notes in game.
Notes with no sustain, should be no longer than 1/16 note. Any note that is longer than 1/16 will have a sustain tail. On the other hand, no note should be shorter than 1/64.
Single notes with sustain tails should have at least a 1/32 note gap between the end of a sustain tail and the beginning of the next note. 1/16 note gap is standard (Figure 13).
| Incorrect | Correct |
|
|
| Figure 13: Sustain note gap. | |
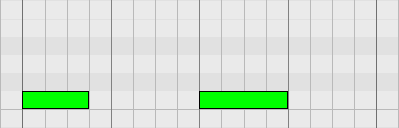
Chords that sustain on keyboards are usually held by a sustain pedal, which we obviously don’t have. Because of this, chords generally should have an 8th note gap between the end of the sustain and the beginning of the next note (Figure 14). This will prevent the stem from muting while the player is shifting hand positions.
|
| Figure 14: 8th note gap between sustained chords. |
This also means that chords that play on quarter notes will need to be authored with no duration (Figure 15).
|
| Figure 15: No sustains for quarter note chords. |
If the standard sustain tail rules still result in the stems being muted between chords/notes, tails may need to be pulled back even further. The following is a pretty good formula to achieving this while remaining uniform:
| BPM | Note Gap |
|---|---|
| 60 and below | 16th note gap |
| 61-120 | 8th note gap |
| 121-160 | Dotted 8th note gap |
| 161-239 | Quarter note gap |
| 240+ | dotted quarter note gap (though this will probably never happen). |
Keep in mind that this means that, often times, notes will not actually have a visible sustain tail, even if it sustains in the stems.
Authoring Rules by Difficulty
Expert Rules
- Expert Gems are MIDI notes 96 (C6) to 100 (E6)
- Expert should represent the actual keyboard part as accurately as possible. Barring general sloppiness (as mentioned before) try to represent even subtle variations in the keyboard part.
- Expert may use all 5 buttons.
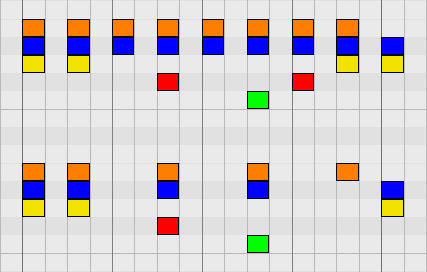
All chord types can be used on expert (Figure 16).
|
| Figure 16: All chord types for Expert keys. |
Durations should only be authored for notes longer than a dotted 8th note for songs over 100bpm (Figure 17), and a regular 8th note for songs under 100bpm (figure 18).
|
| Figure 17: Sustain notes > 100 BPM. |
|
| Figure 18: Sustains notes < 100 BPM. |
Always leave at least a 32nd note gap between the end of a duration and the next note, though a 16th note gap is standard.
Leave at least an 8th note gap after any chord with a sustain tail.
Expert Tips and Tricks
- Be sure to solo and listen to the keyboard part all the way through before beginning to author (as mentioned earlier, we recommend doing the Pro authoring first). Pay attention to changes between sections, chord movement, and melodic lines. This will give you a sense of where the song is going musically and there will be less chance of needing to drastically rearrange your authoring to make things fit.
- Try starting with the central riff or chord progression of a song and then building the rest your authoring around that. There will almost always need to be adjustments, but if you know how you want the most important part to feel, it will help inform your decisions about the rest of the song.
- If a song contains a lot of repetition, it can often be faster to author the repeating section for all difficulties and Copy/Paste through the rest of the song.
- It helps to listen to the full mix, turned down, when authoring. This will help keep a rhythmic and musical context for the part you're authoring.
Grace notes in melodic lines or solos can be represented by adding a 16th note at the start of the note, one button lower than the target note.
|
| Figure 18: Grace note. |
Hard
- Hard Gems are MIDI notes 84 (C5) to 88 (E5)
- Hard should be the "reasonable" version of expert. It should be possible for an expert player to 100% hard with only a minimal amount of practice. Try taking out subtle variations so the parts are more consistent. Removing rhythms that are a 16th note or faster, is a good place to start, but again, this is based on the tempo of the song.
- Durations in Hard should be the same as Expert.
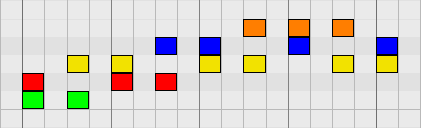
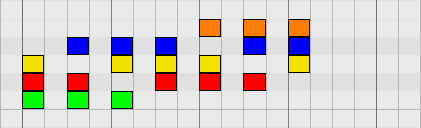
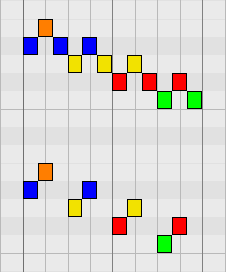
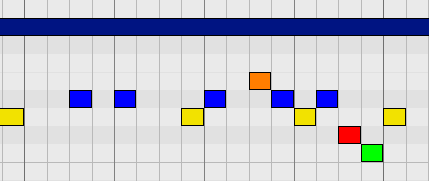
- Three note chords are permitted in Hard. However, keep in mind that if there are long passages of 3 note chords, you will probably want to thin them out to make it easier to play in Hard (Figure 19).
|
| Figure 19: "China Grove" - three note chord section reduced to Hard. |
Hard Tips and Tricks
- Remember, when reducing, to keep the rhythmic feel of the song. If the strong beats of a song are the upbeats, or a syncopated rhythm, make sure not to remove them in haste. Just removing every other 16th note is not always the correct way to reduce.
- When a note is removed during difficulty reduction, the preceding note or chord should never be dragged out to fill the empty space. We remove notes to give the player more time to think about what is coming next, so the space is just as important as the notes.
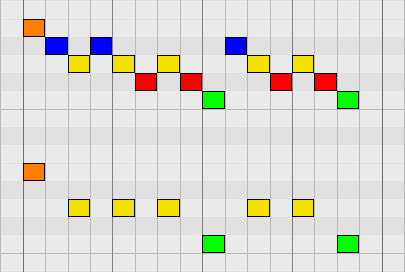
If the song is fast (over 160 bpm), the player shouldn’t be expected to play continuous 8th notes. Thin the chart out by removing every fourth note per half measure (Figure 20).
|
| Figure 20: Reducing continuous 8th notes (over 160 BPM). |
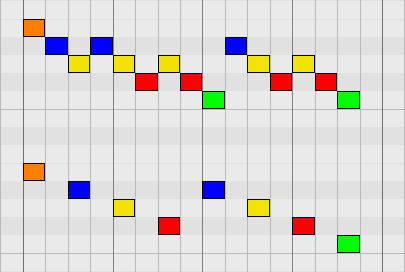
When reducing a 16th note triplet for Hard, try removing the second or third note in the triplet, depending on what feels best. This is a good way to preserve the syncopated groove of the triplet, while making the part is easier to play (Figure 21).
| Method A | Method B |
|
|
| Figure 21: Two methods of reducing triplets in Hard. | |
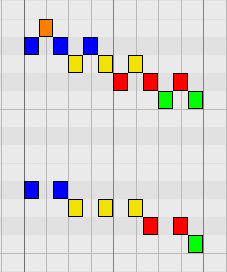
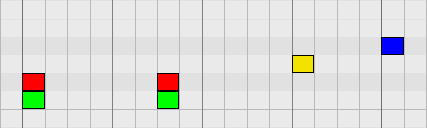
After removing 16th notes in Hard remember to readjust your wrapping. If there was a descending line of 16th notes that was authored as O-B-Y, B-Y-R, Y-R-G, B-Y-R, Y-R-G and you remove every other 16th, you would be left with O-Y, Y-Y, G-Y, Y-G on 8th notes (Figure 22). In the interest of preserving motion, you would want to change that line to O-B-Y-R, B-Y-R-G (Figure 23). As you reduce difficulties, the extra space in time will allow for more linear motion.
| Incorrect |
|
| Figure 22: Incorrect wrapping in Hard. |
| Correct |
|
| Figure 23: Correct wrapping in Hard. |
Medium
- Medium Gems are MIDI notes 72 (C4) to 75 (D#4)
- Medium is probably the hardest difficulty level to author, and yet one of the most important (most casual players start on medium). The key to medium is retaining as much of the rhythmic and melodic feel of expert and hard but in a way that is much easier to play.
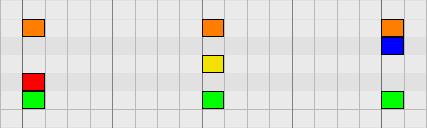
Removing the remaining 8th notes from Medium is a good way to thin out from Hard. Try to only have playable notes on strong quarter note beats (Figure 24).
|
| Figure 24: Medium with at least quarter note spacing. |
All chords in Hard should be retained in Medium unless special circumstances prevent that making sense, such as chords being used to represent harmonizing keyboard parts or strong harmonics.
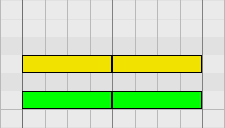
3 note chords are not permitted on Medium (Figure 25).
|
| Figure 25: No three note chords. |
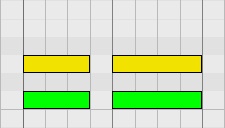
2 note chords are allowed in Medium, but try to avoid fast chord changes (Figure 26).
|
| Figure 26: Removing quick chord changes (170+ BPM). |
Durations in Medium should be pulled back to allow more time to move from note to note. A good general rule is to try and leave a quarter note between the end of a note and the beginning of the next. The easiest way to do this is to pull every note with a duration back an 8th note, that way all your dotted 8ths become 16ths. However, be aware that a duration that is too short will leave a stumpy, broken looking tail on the track. Be sure to check for this in game, especially in sustained chords that have an 8th note gap at the end of their duration, and if a note tail looks too short, pull that note back to a 16th.
Chords should have a 1/4 note of space in between them
Sustained notes that are less than a 1/4 note in length should be made into a single 16th note
Medium Tips and Tricks
Remember, when reducing, to keep the rhythmic feel of the song. If the strong beats of a song are the upbeats, or a syncopated rhythm, make sure not to remove them in haste. Removing every other 8th note is not always the correct way to reduce. In Medium, it is better to leave more space between syncopated notes then to leave them out.
Once you remove the additional 8th gems you are going to need to adjust your wrapping again. If you had the 8th gem pattern of O-B-Y-R, B-Y-R-G, and you remove every other 8th gem, you are left with O-Y, B-R. You could then readjust these gems so that the quarter gem pattern would be B-Y-R-G (Figure 27).
|
| Figure 27: Wrapping gems from Hard to Medium. |
When reducing triplet patterns in Medium, it is best to only keep the down beat of the triplet (Figure 28).
|
|
| Figure 28: Reducing triplets from Hard to Medium. | |
Easy
- Easy Gems are MIDI notes 60 (C3) to 62 (D3)
Easy should be really easy. No player will complain that easy is too easy, they’ll just move up to medium, so make it EASY! The easy player should be able to look at the track, see the note, look at their keyboard, move their finger to the right button, play the key, then look back up for the next note. That’s a lot to do between every note, so make sure you leave a significant amount of space.
On easy, remove all remaining quarter notes when possible. It's good practice to leave half note spaces between notes for easy players (Figure 29).
|
| Figure 29: Reducing from Medium to Easy. Nightmare tier (120 BPM). |
Sustains on Easy should be the same as sustains on Medium.
There are no chords in easy.
Solo Sections
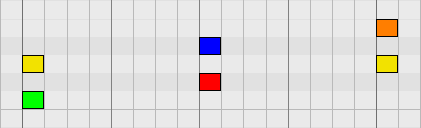
- MIDI note 103 (G6) marks solo sections (Figure 30).
|
| Figure 30: "Roundabout" - Expert organ solo (with solo marker). |
Keys solos should be dictated by the music, which can be a gray area. Try to avoid putting solo markers on little fills and repeated lead lines, and use it only when there is an obvious solo.
If a song ends with a solo make sure to end the solo marker as early as possible. This leaves time for the solo score marker to pop up before the track pulls out at the end of the song.
Trill Markers
- MIDI note 127 (G8) marks trill sections.
Trills markers trigger free form lanes to appear on the track that allows the player to play a trill, between two notes, without playing the actual authored rhythm of the part (Figure 31). As long as the player is alternating between the two notes at 160ms or faster, they will be allowed to continue playing in the free form lanes. If they dip below 160ms, the free form lanes will disappear, and they will be forced to play to the rhythm at which the part is authored.
- The threshold of 160ms is a hard coded number, so edge cases can creep up, if the tempo of the song is too low or too fast, where using a trill marker may not feel as good as just playing the authored rhythm.

|
| Figure 31: Rock Band 3 trill markers. |
Notes should be authored according to the rhythm of the song, and trill lanes placed above them.
Remember that this can only be used for two note trills, three note trills or higher will break the game.
Note: Make sure your markers are authored with a high velocity, or MagmaCompiler may report note spacing errors when authoring on lower difficulties.
Character Animations
Character Animations can be inserted as text events, which will change the actions, and attitude of the character within a game.
Character Animations should not be inserted between bars 1-3.
Character Animations are as follows:
| Text Event | Animation |
|---|---|
| [idle_realtime] | Character is idling in real time, not synced to the beat. Use this for the intro & ends of songs or anywhere else you don't want a non-playing character bopping to the beat. |
| [idle] | Character is idling normally (not playing/singing). |
| [idle_intense] | Character is idling in an intense manner. |
| [play] | Character is playing. |
| [mellow] | Character is playing in a mellow manner. |
| [intense] | Character is playing in an intense manner. |
Overdrive
Overdrive is placed on 5 lane keyboard tracks the same way you would place it for a guitar or drum track. For Keyboards, you must place Overdrive in the 5 lane and Expert Pro Keys tracks, and they need to match. See the Overdrive and Big Rock Endings document for more details.
A Few Final Tips
Assign the PART KEYS midi track to a percussive sound (a wood block works nicely). This makes it a lot easier to match the rhythm of the keyboard part because you can hear what you’re authoring. However, as mentioned before, Pro Keys should be authored first, so you can use that as a reference for the rhythms on 5 lane.
Expert should be authored first then simplified to make the lower difficulties.
Make sure to check out Common_Authoring_Mistakes after you author